Guitar
It's been a while since my last update. This is primarily due to other, more pressing tasks in life. I haven't done any work on the T-beam guitar, except from a lot of thinking.
In the meantime, I've made a modification to my old Squier Strat. Mostly because I am going to need a functioning guitar during the many months, I expect the T-beam construction to take. But also to get a feel at using a router on aluminium. Plus to try out the pickups, which I bought for the T-beam.

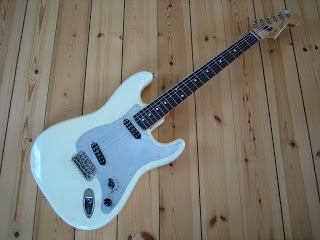
My modified strat with neck only, parallel, bridge only, series, parallel+counterphase and series+counterphase switching options.
The modification consists of an aluminium pickguard, the two Seymour Duncan single coil format humbuckers (a Little '59 for the neck and a Jeff Beck Junior for the bridge), a concentric pot for tone and volume plus a six-way rotary switch allowing combinations of serial/parallel and phase/counterphase pickup configurations.
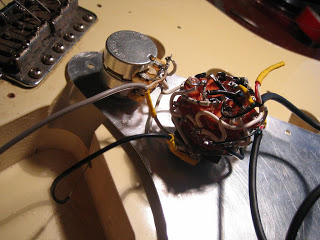
First step was soldering wires to the six way switch. The wiring diagram can be seen here (go to "Switching between two humbuckers"). It took quite some time and was way less straightforward than it looks on the diagram. Not that it was difficult as such, but with 28 lugs (also counting those connecting to the pickups), there was quite a lot of wires crossing one another - and many possible mistakes to be done.
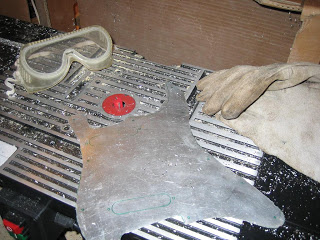
Next step was making the pickguard. I had an old piece of thin aluminium lying around, and I traced the contours of the original pickguard on it with a permanent marker. I also traced the contours of the screw holes and pickup holes except for the middle one. Rough cutting was done with a pair of tin snips. I used my new plunge router and a router table for the next step of shaping by putting the pickguard flat on the router table and by freehand letting the contour, which I'd traced on the aluminium, follow the router bit.

Routing the edges
This was followed by putting my belt sander on its back and smoothing the edges of the pickguard on the belt. The result was pretty nice, but I had to finish the edges with a small rotary tool to get them sufficiently smooth.Pickup holes were made by drilling most of the hole with an ordinary drill and following the above process - except for the belt sander - for finishing.
Not that shaping such a relatively thin sheet of aluminium gave me a lot of aluminium routing experience. The aluminium bars for the T-beam are ten times as thick and will be quite different to handle - but still... it gave me an idea of the amount of shavings, such a process produces. And I feel a little more confident routing the T-beam now. I'm still going to need more practice, though.

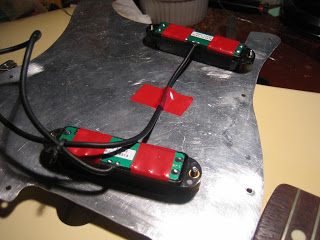
Fragile pickups repaired
Having finished the pickguard, I mounted the pickups, switch and concentric pot on it. I had to repair the pickups with electrical tape since their outer plastic shells had become loose. They were brand new, and I didn't drop them or treat them violently in any way, so it's a bit of a disappointment that Seymour Duncan makes such fragile pickups.
Almost finished, I soldered ground wires from bridge and jack. The knobs for the concentric pot had to be drilled in order to fit the pot shaft. I did so with a handheld drill, and I didn't drill completely straight, so the knobs are a bit skewed. I guess I should have been either a: more attentive, or b: using a drill press. I'll go buy me a drill press for the future.

Many wires on one switch
It gave a bit of trouble mounting the six way switch in the pickguard. After I mounted it, it was very hard to turn. After disassembly and assembly, it worked decently, but not completely smooth. It'll have to do for now, but I'll have to look further into it some day.
The sound is really good. I especially like the counterphase settings, which give a more bubbling and buzzy sound. Apart from a tendency not to work on the "bridge pickup only" setting unless wiggled a bit, the six way switch is very convenient.
The looks of the finished guitar is nothing particular. The creme colour of the guitar certainly does not match the aluminium pickguard very well. I could paint the guitar. Or cover the pickguard in brown or burgundy leather. I could even make a similar pickguard in copper.
There's lots of things, I could do, but I'd better start concentrating on the T-beam.
- Shaping Aluminium Pickguard
A few days ago, I was asked about how I made my aluminium pickguard, here is a quick overview of the tools I use, it might interest unskilled beginners such as I was one year ago. So I work on 1,5 mm alu plate, and I start with cutting roughly with a...
- Exposed Cabling In Copper Tubes
The black SG that I used for experiments with coarse and fine tuners has been modified further. I wanted to be able to phase switch the pickups. Plus, I'd had this idea of having the cables run in copper tubes to shield them from noise. The copper...
- Making My Own T-beam
As mentioned earlier, I've had an unexpected hard time finding a suitable T-beam. There are lots of them available, but none wide enough for me to make holes for the pickups without intersecting the top flange completely. For now, I have given...
- A Different Tuner System For Headless Designs
The guitar I'm planning at the moment might be the first in a series. If it turns out well and the building process is fun (the planning sure is), I expect to build another one. And probably then another. And so on. If the guitar turns out sounding...
- Alternatives To The T-beam
I've tried quite a lot of places to get the crucial component, the T-beam. It is more difficult than I originally expected. I've tried a couple of scrap metal dealers and the leading Danish metal distributor. Plus a couple of web-based stores....
Guitar
In the meantime...
It's been a while since my last update. This is primarily due to other, more pressing tasks in life. I haven't done any work on the T-beam guitar, except from a lot of thinking.
In the meantime, I've made a modification to my old Squier Strat. Mostly because I am going to need a functioning guitar during the many months, I expect the T-beam construction to take. But also to get a feel at using a router on aluminium. Plus to try out the pickups, which I bought for the T-beam.
My modified strat with neck only, parallel, bridge only, series, parallel+counterphase and series+counterphase switching options.
The modification consists of an aluminium pickguard, the two Seymour Duncan single coil format humbuckers (a Little '59 for the neck and a Jeff Beck Junior for the bridge), a concentric pot for tone and volume plus a six-way rotary switch allowing combinations of serial/parallel and phase/counterphase pickup configurations.
First step was soldering wires to the six way switch. The wiring diagram can be seen here (go to "Switching between two humbuckers"). It took quite some time and was way less straightforward than it looks on the diagram. Not that it was difficult as such, but with 28 lugs (also counting those connecting to the pickups), there was quite a lot of wires crossing one another - and many possible mistakes to be done.
Next step was making the pickguard. I had an old piece of thin aluminium lying around, and I traced the contours of the original pickguard on it with a permanent marker. I also traced the contours of the screw holes and pickup holes except for the middle one. Rough cutting was done with a pair of tin snips. I used my new plunge router and a router table for the next step of shaping by putting the pickguard flat on the router table and by freehand letting the contour, which I'd traced on the aluminium, follow the router bit.
Routing the edges
This was followed by putting my belt sander on its back and smoothing the edges of the pickguard on the belt. The result was pretty nice, but I had to finish the edges with a small rotary tool to get them sufficiently smooth.Pickup holes were made by drilling most of the hole with an ordinary drill and following the above process - except for the belt sander - for finishing.
Not that shaping such a relatively thin sheet of aluminium gave me a lot of aluminium routing experience. The aluminium bars for the T-beam are ten times as thick and will be quite different to handle - but still... it gave me an idea of the amount of shavings, such a process produces. And I feel a little more confident routing the T-beam now. I'm still going to need more practice, though.
Fragile pickups repaired
Having finished the pickguard, I mounted the pickups, switch and concentric pot on it. I had to repair the pickups with electrical tape since their outer plastic shells had become loose. They were brand new, and I didn't drop them or treat them violently in any way, so it's a bit of a disappointment that Seymour Duncan makes such fragile pickups.
Almost finished, I soldered ground wires from bridge and jack. The knobs for the concentric pot had to be drilled in order to fit the pot shaft. I did so with a handheld drill, and I didn't drill completely straight, so the knobs are a bit skewed. I guess I should have been either a: more attentive, or b: using a drill press. I'll go buy me a drill press for the future.
Many wires on one switch
It gave a bit of trouble mounting the six way switch in the pickguard. After I mounted it, it was very hard to turn. After disassembly and assembly, it worked decently, but not completely smooth. It'll have to do for now, but I'll have to look further into it some day.
The sound is really good. I especially like the counterphase settings, which give a more bubbling and buzzy sound. Apart from a tendency not to work on the "bridge pickup only" setting unless wiggled a bit, the six way switch is very convenient.
The looks of the finished guitar is nothing particular. The creme colour of the guitar certainly does not match the aluminium pickguard very well. I could paint the guitar. Or cover the pickguard in brown or burgundy leather. I could even make a similar pickguard in copper.
There's lots of things, I could do, but I'd better start concentrating on the T-beam.
- Shaping Aluminium Pickguard
A few days ago, I was asked about how I made my aluminium pickguard, here is a quick overview of the tools I use, it might interest unskilled beginners such as I was one year ago. So I work on 1,5 mm alu plate, and I start with cutting roughly with a...
- Exposed Cabling In Copper Tubes
The black SG that I used for experiments with coarse and fine tuners has been modified further. I wanted to be able to phase switch the pickups. Plus, I'd had this idea of having the cables run in copper tubes to shield them from noise. The copper...
- Making My Own T-beam
As mentioned earlier, I've had an unexpected hard time finding a suitable T-beam. There are lots of them available, but none wide enough for me to make holes for the pickups without intersecting the top flange completely. For now, I have given...
- A Different Tuner System For Headless Designs
The guitar I'm planning at the moment might be the first in a series. If it turns out well and the building process is fun (the planning sure is), I expect to build another one. And probably then another. And so on. If the guitar turns out sounding...
- Alternatives To The T-beam
I've tried quite a lot of places to get the crucial component, the T-beam. It is more difficult than I originally expected. I've tried a couple of scrap metal dealers and the leading Danish metal distributor. Plus a couple of web-based stores....
