Guitar
Here's an example of a rebuild project that honestly doesn't make a whole lot of sense in terms of "effort" vs. "value" - but what the hell. Its fulfilling to take an instrument someone has managed to destroy and bring it back to not only being functional but also looking good.
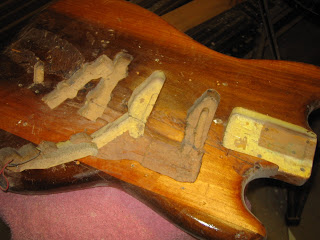
This project started off with an early 70s (71 to 73) Musicmaster Bass body that I got on Ebay. The body is made of poplar, as most of the early Musicmasters were, and had not only been very roughly routed out for a number of different pickups, but also apparently had been cracked in half at some point and then poorly reglued such that the body was no longer flat !! The good part was the body only cost $10 plus shipping .. because no one else bid on it.
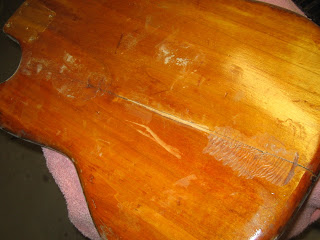
So the first step was to REBREAK the body along the glue line - then reglue it while it was clamped flat. I clamped a maple board on each side of the break - parallel to the glue line - then put the body on the edge of my workbench - and hit the body with a mallet on the side that was overhanging such that the body split evenly.
Then I reglued the body - though there were some gaps from wood splintering - and clamped it flat. I used a liberal amount of Titebond to glue it all together.
I set the body aside then - until I randomly found a defretted early Musicmaster neck on the Denver Craigslist that was reasonably priced.
Finding the neck motivated me to restart the project. I then started the filling in process. As I said, there were gaps along the new glue seam, which I filled in with long splinters of poplar. At least the body was solid and flat now.
Next came filling in the routings - which as you can see were crudely done. I routed out the areas to slightly less than 3/4 inch, so that I could use regular 3/4 inch stock poplar to plug the body.
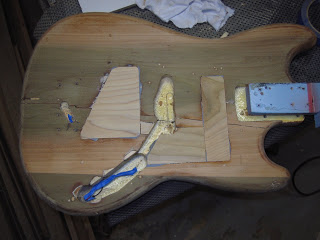
As you can see I routed out the body in 3 areas - one triangular area near the bridge, one rectangular area towards the neck and a large area below the stock pickup routing.
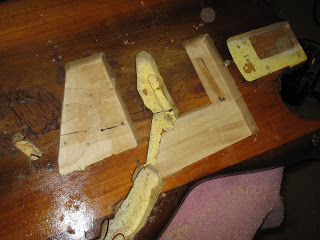
This picture has the three poplar block placed but not yet glued in position. Note that I cut the block so that the grain was in the same direction as the rest of the body - not sure that really matters on a rebuild of this magnitude!

I glued and clamped in the three poplar blocks plus some smaller pieces at the edges of the control routing and some small filler pieces here and there - the goal was to minimize how much filler I'd have to use.
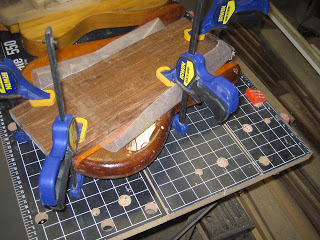
Once everything was dried - I went around the gaps and used a two part plumbers epoxy as a filler for gaps. The plumbers putty doesn't shrink and has the consistency of plasticine or fimo. It is very dense but works great for filling in limited areas and is actually drillable.
Sanding everything down with a random orbital sander and a 100 grit pad brought all the filled in areas down to the level of the surface. Then a sanding with a 220 grit pad gave the front and back of the body a nice finish. Some block and hand sanding prepped the edges of the body for sealing.
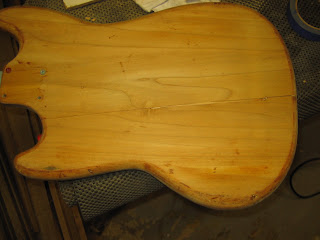
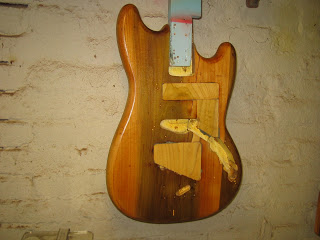
I used the usual vinyl sealer on the body - spraying several heavy coats to seal the somewhat porous poplar body. I wet sanded with 320 grit paper between coats. Though the plugs are prominent, the body was really starting to shape up.
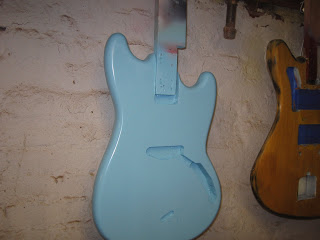
Because most if not all of the 70s Musicmasters didn't have a primer coat - I decided to move right to color coats after the sealer coats. I applied the Daphne Blue heavily, since it would be acting as a primer in effect. Once the first color coat was on, I sanded the body again, to reveal some high spots - in the process removing most of the blue finish on the front of the body - much as I would have with an initial white primer coat.
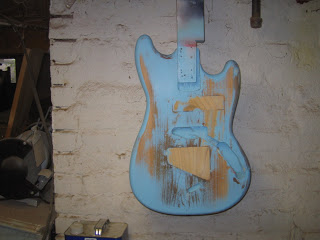
I then sprayed a few more coats, now that the body surfaces were really getting flat and smooth. The Daphne Blue really started to look good.
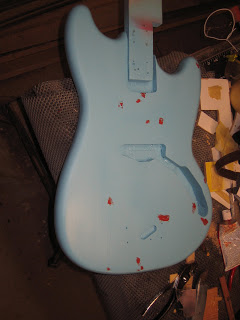
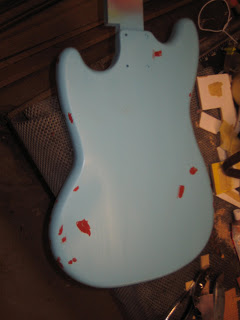
The next step was to look for all the little dings and spot flaws and apply Bondo glazing putty to fill these small imperfections.
Those red spots will be wet sanded and then a few more color coats will be applied - and a clear coat - and then I'll begin on the neck !
- Musicmaster Disaster: Completed
Here's a long overdue follow-up on a post from a few years ago. I started off with an early 70s poplar Fender Musicmaster Bass body that had been mercilessly routed for different pickups and then apparently broken in half and badly reglued together. ...
- 1968 Fender Jazz Bass: Sonic Blue Regret And Restoration
This project represents an unfortunately common scenario from the 1970s, where an instrument's owner decided that the "natural" look was preferable to the original factory custom color. Guess the attitude was that "wood was good" - during this...
- 1976 Fender Precision Bass: Refinish To Lake Placid Blue - A Classic 60s Color!
This is a fairly straight forward refinish of a stripped Fender Precision bass body in one of Fender's classic 1960s custom colors, Lake Placid Blue. As with all of the Fender custom colors of the 60s, Lake Placid Blue was originally a car color for...
- Radical Ibanez Roadstar Bassmod, In Daphne Blue
Here's a project I just started a few days ago - for a client from the local "Bassment" forum. This started out as an Ibanez Roadstar 2 Bass - presumably from the 80s. As you can see from a picture of the bass before any mods, it was a fairly conventional...
- 1971 Fender Precision Bass Refinish In Sonic Blue !!!
Another Fender Precision Bass project - an older maple board P-bass that has been through some changes, namely, the body has the classic added Jazz bass pickup at the bridge route, plus a route to sink a BadAss 1 bridge into the top and of course, a route...
Guitar
Musicmaster Disaster !! Another Daphne Blue Fender Bass
Here's an example of a rebuild project that honestly doesn't make a whole lot of sense in terms of "effort" vs. "value" - but what the hell. Its fulfilling to take an instrument someone has managed to destroy and bring it back to not only being functional but also looking good.
This project started off with an early 70s (71 to 73) Musicmaster Bass body that I got on Ebay. The body is made of poplar, as most of the early Musicmasters were, and had not only been very roughly routed out for a number of different pickups, but also apparently had been cracked in half at some point and then poorly reglued such that the body was no longer flat !! The good part was the body only cost $10 plus shipping .. because no one else bid on it.
So the first step was to REBREAK the body along the glue line - then reglue it while it was clamped flat. I clamped a maple board on each side of the break - parallel to the glue line - then put the body on the edge of my workbench - and hit the body with a mallet on the side that was overhanging such that the body split evenly.
Then I reglued the body - though there were some gaps from wood splintering - and clamped it flat. I used a liberal amount of Titebond to glue it all together.
I set the body aside then - until I randomly found a defretted early Musicmaster neck on the Denver Craigslist that was reasonably priced.
Finding the neck motivated me to restart the project. I then started the filling in process. As I said, there were gaps along the new glue seam, which I filled in with long splinters of poplar. At least the body was solid and flat now.
Next came filling in the routings - which as you can see were crudely done. I routed out the areas to slightly less than 3/4 inch, so that I could use regular 3/4 inch stock poplar to plug the body.
As you can see I routed out the body in 3 areas - one triangular area near the bridge, one rectangular area towards the neck and a large area below the stock pickup routing.
This picture has the three poplar block placed but not yet glued in position. Note that I cut the block so that the grain was in the same direction as the rest of the body - not sure that really matters on a rebuild of this magnitude!
I glued and clamped in the three poplar blocks plus some smaller pieces at the edges of the control routing and some small filler pieces here and there - the goal was to minimize how much filler I'd have to use.
Once everything was dried - I went around the gaps and used a two part plumbers epoxy as a filler for gaps. The plumbers putty doesn't shrink and has the consistency of plasticine or fimo. It is very dense but works great for filling in limited areas and is actually drillable.
Sanding everything down with a random orbital sander and a 100 grit pad brought all the filled in areas down to the level of the surface. Then a sanding with a 220 grit pad gave the front and back of the body a nice finish. Some block and hand sanding prepped the edges of the body for sealing.
I used the usual vinyl sealer on the body - spraying several heavy coats to seal the somewhat porous poplar body. I wet sanded with 320 grit paper between coats. Though the plugs are prominent, the body was really starting to shape up.
Because most if not all of the 70s Musicmasters didn't have a primer coat - I decided to move right to color coats after the sealer coats. I applied the Daphne Blue heavily, since it would be acting as a primer in effect. Once the first color coat was on, I sanded the body again, to reveal some high spots - in the process removing most of the blue finish on the front of the body - much as I would have with an initial white primer coat.
I then sprayed a few more coats, now that the body surfaces were really getting flat and smooth. The Daphne Blue really started to look good.
The next step was to look for all the little dings and spot flaws and apply Bondo glazing putty to fill these small imperfections.
Those red spots will be wet sanded and then a few more color coats will be applied - and a clear coat - and then I'll begin on the neck !
- Musicmaster Disaster: Completed
Here's a long overdue follow-up on a post from a few years ago. I started off with an early 70s poplar Fender Musicmaster Bass body that had been mercilessly routed for different pickups and then apparently broken in half and badly reglued together. ...
- 1968 Fender Jazz Bass: Sonic Blue Regret And Restoration
This project represents an unfortunately common scenario from the 1970s, where an instrument's owner decided that the "natural" look was preferable to the original factory custom color. Guess the attitude was that "wood was good" - during this...
- 1976 Fender Precision Bass: Refinish To Lake Placid Blue - A Classic 60s Color!
This is a fairly straight forward refinish of a stripped Fender Precision bass body in one of Fender's classic 1960s custom colors, Lake Placid Blue. As with all of the Fender custom colors of the 60s, Lake Placid Blue was originally a car color for...
- Radical Ibanez Roadstar Bassmod, In Daphne Blue
Here's a project I just started a few days ago - for a client from the local "Bassment" forum. This started out as an Ibanez Roadstar 2 Bass - presumably from the 80s. As you can see from a picture of the bass before any mods, it was a fairly conventional...
- 1971 Fender Precision Bass Refinish In Sonic Blue !!!
Another Fender Precision Bass project - an older maple board P-bass that has been through some changes, namely, the body has the classic added Jazz bass pickup at the bridge route, plus a route to sink a BadAss 1 bridge into the top and of course, a route...