Guitar
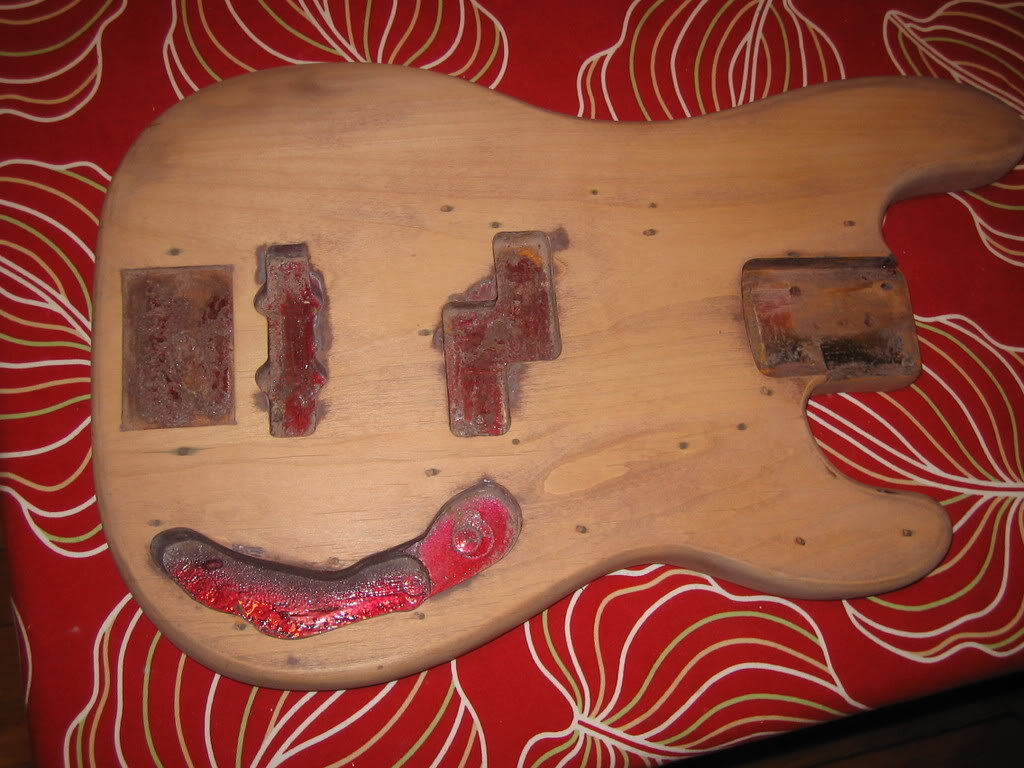
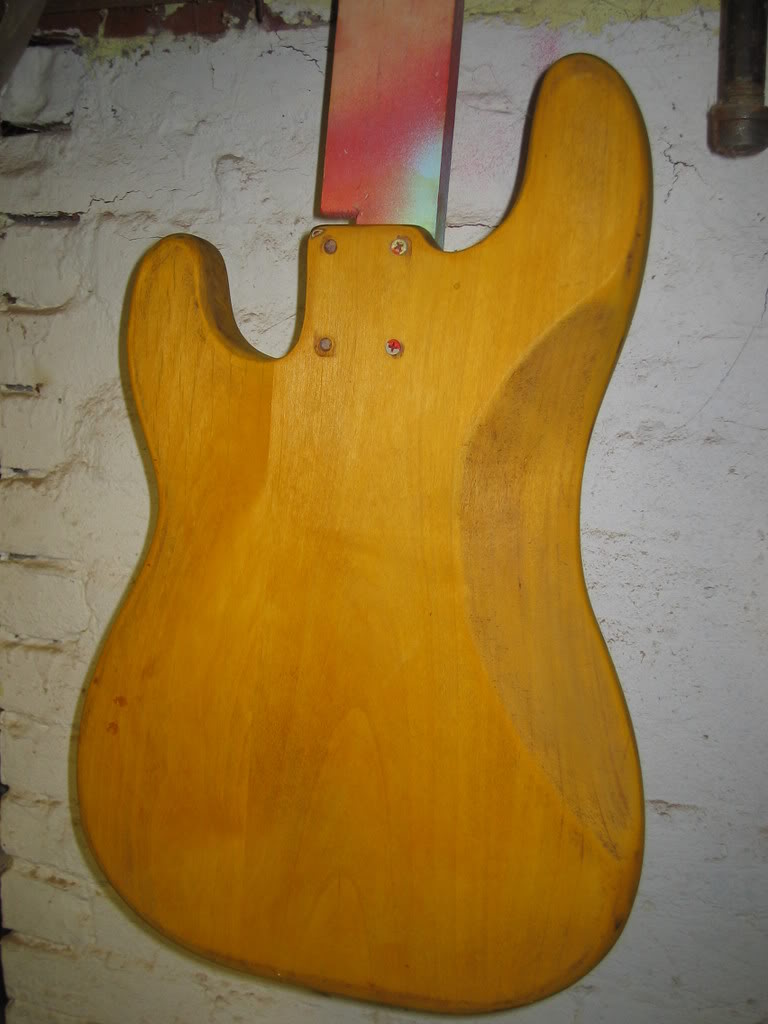
Another Fender Precision Bass project - an older maple board P-bass that has been through some changes, namely, the body has the classic added Jazz bass pickup at the bridge route, plus a route to sink a BadAss 1 bridge into the top and of course, a route for an added control pot or two. The body was also refinished in a metallic sparkle red - pretty nice job actually, but not what the owner wanted. The bass had been sold as a 1971/72 Precision, but the current owner wasn't certain of the originality of the body.
After some the decision was made to refinish the bass in one of the custom colors still available in 1971 - a number of Fender's classic custom colors were dropped after 1969 for the P-bass - but a few remained, such as Candy Apple Red, Lake Placid Blue, Olympic White, Black, Shoreline Gold, Shoreline Silver and Sonic Blue.
Digging through my paint collection, I discovered that the PPG Sonic Blue acrylic lacquer I had mixed by Kwik Autobody of Medford - about 13 years ago!!! - was still in excellent condition. Here's to quality packaging. After showing the owner a paint stick of the Sonic Blue, he decided that Sonic Blue with a white pickguard would be a very cool, retro looking combination.
But before spending the money on a complete refinish, we decided to confirm that the body was in fact of the correct vintage. To do this, I sanded the finish in two areas on the back of the body: one on the centerline near the butt end of the body and one between the centerline and bass-side cutaway. This revealed the two distinctive doweled pin marks that are on Fender P-bass bodies from between 1967 and the mid-70s. Combined with the bridge position and the lack of a route from the pickup to the control cavity, I confirmed that the body did match the neck, which was dated Dec 1971.
The first task was to remove the existing finish, and see what I had to work with underneath - I also was concerned that the 80s looking finish would be some polyurethane or polyester finish that would be impossible to get off. But a few hours later, courtesy of some zip strip, plastic scrapers, stripping pads and my random orbital sander, I had the majority of the finish off the entire body.
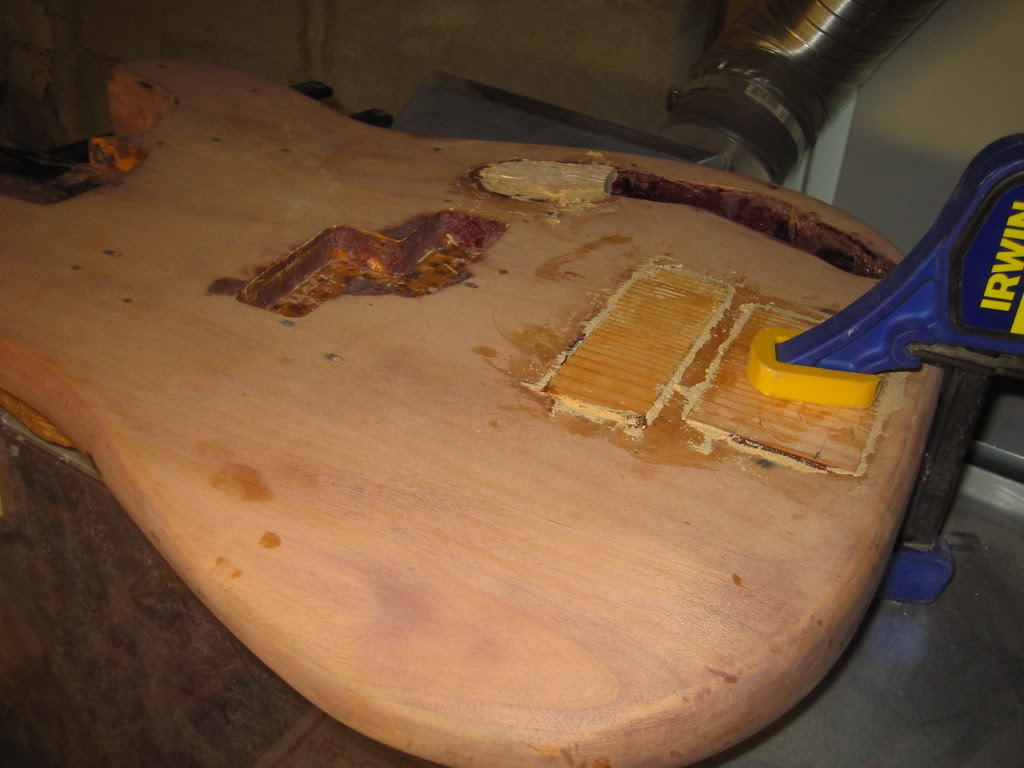
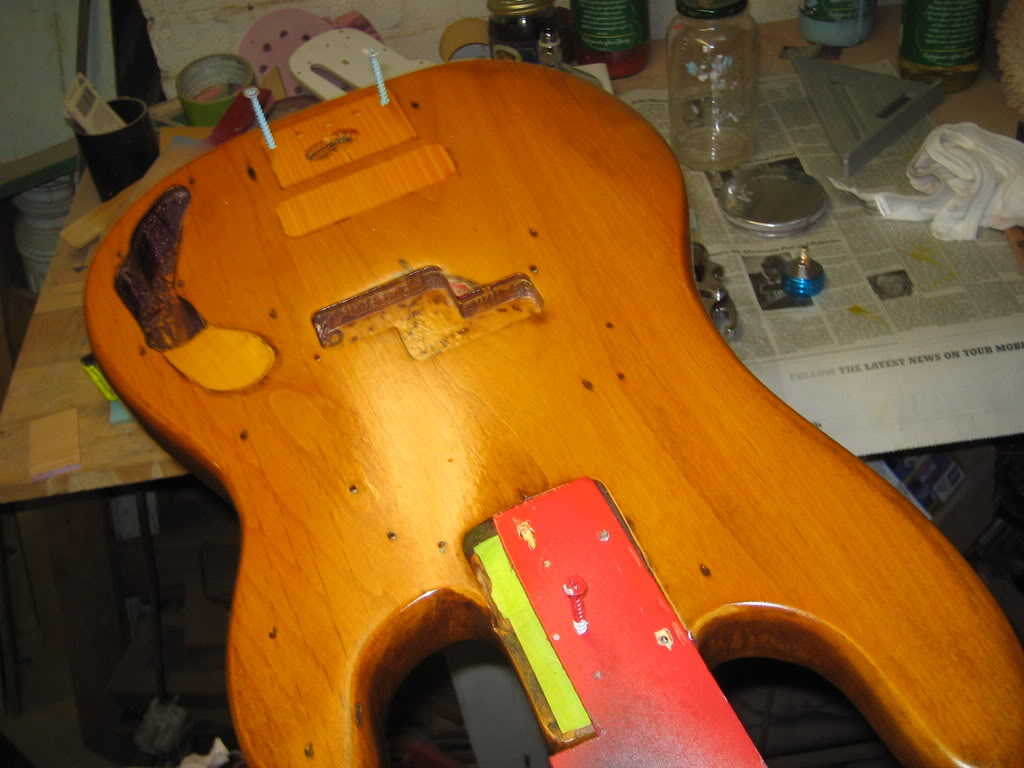
The came the task of filling in the extra routes before starting the refin process.
I cut a piece of hard douglas fir (aka "pumpkin pine" - a popular material for flooring) the a thickness that matched the depth of the bridge "sink" - and then cut it to shape so it would fit into the squared off hole exactly.
For the jazz bass route, I first cut a piece of alder block to fill the cavity, using split hardwood dowels to fill in to screw reliefs - and then routed a shallow (1/8th inch) rectangle so that I could cover up the repair with a smooth even piece of douglas fir, as with the bridge sink.
For the control cavity route, I simply cut and shaped a block of fir to fit into the route and glued it securely in - I wasn't as worried about hiding that route since it was going to be under the pickguard.

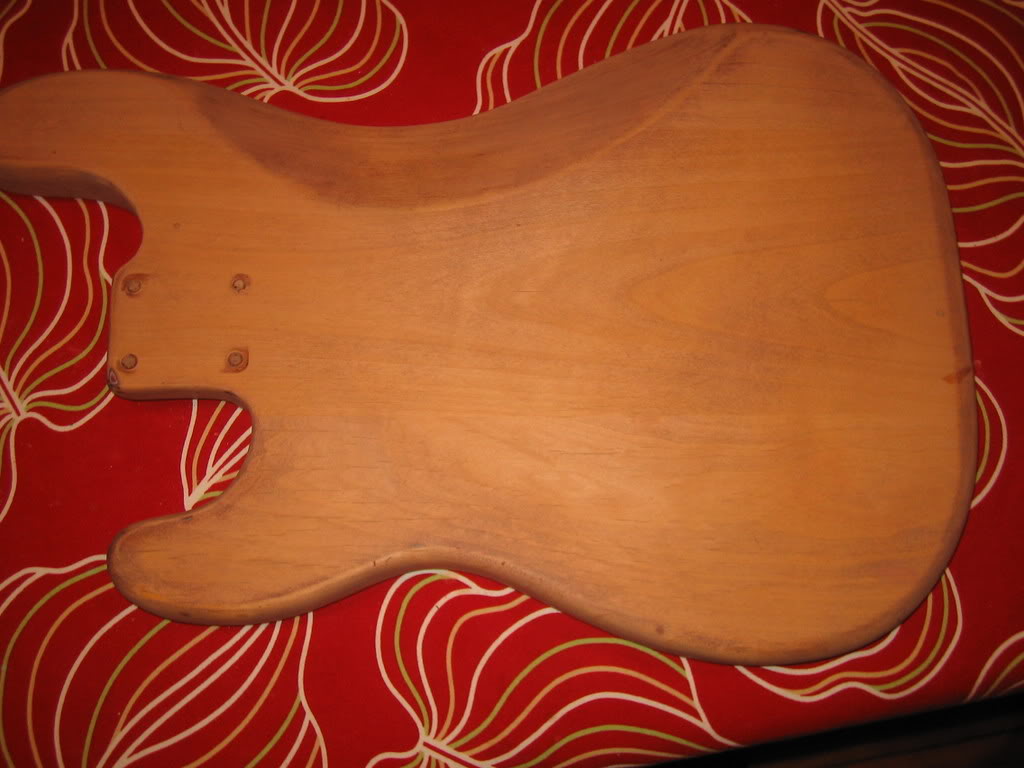
Once the blocks were glued in - and had dried and any small gaps were filled with wood shavings or minimal wood filler - the body was sanded down to prep it for staining, as would have been done by Fender. There were a few slight remnants of yellow stain on the guitar body, even after all the refinishes and sanding and stripping.
The yellow does show where some of the staining from the brown undercoat that had previously been on the guitar still was showing. Even without the extra routes, this body would not have been a good candidate for a Fender 3-color sunburst refin.
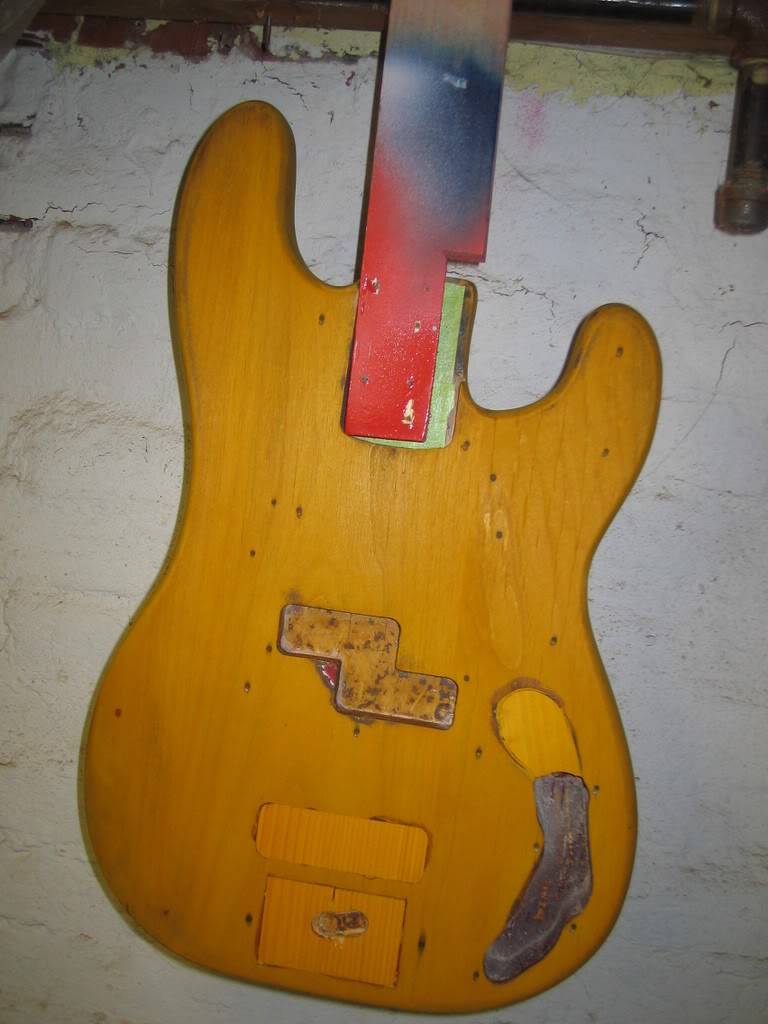
Following the staining - several vinyl sealer coats were sprayed on, to seal the grain and prepare the body for primer and paint. The vinyl sealer coat is more or less the same as the Fullerplast material Fender used throughout the later 50s, the 60s and into the early 70's until the thick "poly" finishes came about. Both sunburst and custom color Fenders during that era would have had the yellow stain/Fullerplast treatment as an undercoat.
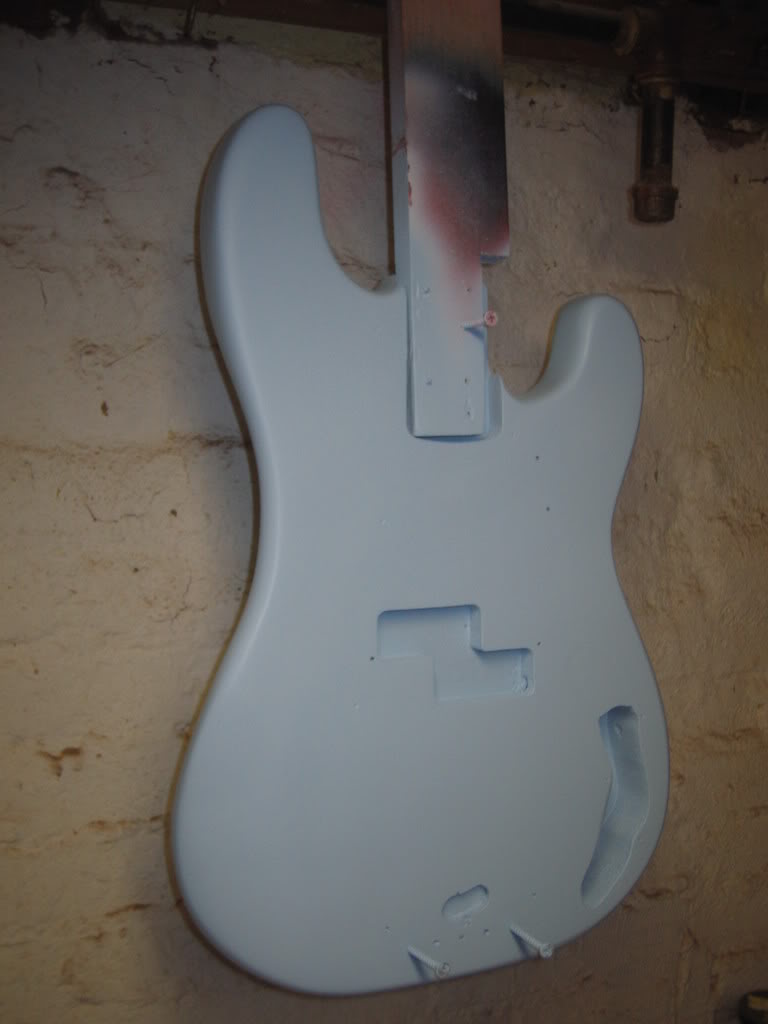
After a careful block sanding, the body was now ready for its white primer coat. An initial coat was sprayed, which revealed some dings and scratches and rough spots. A small amount of red glazing putty and liberal wet sanding was used to even out these areas and the filled-in routes. Then a second white primer coat was applied and wet sanded to prepare for a color coat.
I didn't take any pictures of the priming process - instead we will jump right to the first color coat!
As I said above - I found that the near vintage Sonic Blue lacquer I had was still in excellent condition - so I thinned it about 1 to 1 with regular lacquer thinner - and started spraying. I sprayed several coats on, without any sanding between - to build up a color base. The picture below is shortly after spraying - note that the finish is fairly "flat" - as it has not been wet sanded yet and I was spraying with a bit thicker paint and higher pressure to build up a good base.
This coat will be wet sanded, which will undoubtedly result in a few sand throughs to the primer, but then a second "wet" color coat will be all the color needed. I expect to finish the color coats and have a clear coat on the bass by the end of this week - check back then. This will deepen and strengthen the blue in this finish.
(Update May 16th, 2008)
I have completed the bass - it took a few extra color coats on the front of the bass to get the routing fills level with the rest of the surface, but after a few untinted clear coats, the bass was ready for wet sanding and then buffing.
- 1976 Fender Precision Bass: Refinish To Lake Placid Blue - A Classic 60s Color!
This is a fairly straight forward refinish of a stripped Fender Precision bass body in one of Fender's classic 1960s custom colors, Lake Placid Blue. As with all of the Fender custom colors of the 60s, Lake Placid Blue was originally a car color for...
- 1978 Fender Musicmaster Bass: Detonator Yellow With Competition Stripes!
Here is a refinish of a vintage instrument, but not to a "vintage" color - rather, the owner wanted to replicate the look he had seen on Dodge's own "reissue" of the Superbee muscle car - a color that Chrysler labeled "Detonator Yellow". To really...
- 1966 Fender Jazzmaster: Aged Olympic White
< A fairly straightforward project here - a 1966 Fender Jazzmaster body that had been poorly refinished over the years and that the owner wanted to do in an aged Olympic White finish. The original Olympic White is a color thats seldom seen - its a bright...
- G&l Asat Bass Refinish
Ok some of you may wince, because this bass had a very nicely done factory cherry sunburst finish when I started on it, but the owner simply didn't like it and wanted something brighter and louder and more ... ORANGE !!! This is a very cool bass -...
- Squier Strat Quickie Paint Job
A customer acquired Squier of indeterminate vintage, for free I believe, and decided they wanted to "spiff" it up without spending a lot. Since the Squier had the typical poly urethane/polyester bowling ball finish and it was a heavy plywood body, we...
Guitar
1971 Fender Precision Bass Refinish in Sonic Blue !!!
Another Fender Precision Bass project - an older maple board P-bass that has been through some changes, namely, the body has the classic added Jazz bass pickup at the bridge route, plus a route to sink a BadAss 1 bridge into the top and of course, a route for an added control pot or two. The body was also refinished in a metallic sparkle red - pretty nice job actually, but not what the owner wanted. The bass had been sold as a 1971/72 Precision, but the current owner wasn't certain of the originality of the body.
After some the decision was made to refinish the bass in one of the custom colors still available in 1971 - a number of Fender's classic custom colors were dropped after 1969 for the P-bass - but a few remained, such as Candy Apple Red, Lake Placid Blue, Olympic White, Black, Shoreline Gold, Shoreline Silver and Sonic Blue.
Digging through my paint collection, I discovered that the PPG Sonic Blue acrylic lacquer I had mixed by Kwik Autobody of Medford - about 13 years ago!!! - was still in excellent condition. Here's to quality packaging. After showing the owner a paint stick of the Sonic Blue, he decided that Sonic Blue with a white pickguard would be a very cool, retro looking combination.
But before spending the money on a complete refinish, we decided to confirm that the body was in fact of the correct vintage. To do this, I sanded the finish in two areas on the back of the body: one on the centerline near the butt end of the body and one between the centerline and bass-side cutaway. This revealed the two distinctive doweled pin marks that are on Fender P-bass bodies from between 1967 and the mid-70s. Combined with the bridge position and the lack of a route from the pickup to the control cavity, I confirmed that the body did match the neck, which was dated Dec 1971.
The first task was to remove the existing finish, and see what I had to work with underneath - I also was concerned that the 80s looking finish would be some polyurethane or polyester finish that would be impossible to get off. But a few hours later, courtesy of some zip strip, plastic scrapers, stripping pads and my random orbital sander, I had the majority of the finish off the entire body.
The came the task of filling in the extra routes before starting the refin process.
I cut a piece of hard douglas fir (aka "pumpkin pine" - a popular material for flooring) the a thickness that matched the depth of the bridge "sink" - and then cut it to shape so it would fit into the squared off hole exactly.
For the jazz bass route, I first cut a piece of alder block to fill the cavity, using split hardwood dowels to fill in to screw reliefs - and then routed a shallow (1/8th inch) rectangle so that I could cover up the repair with a smooth even piece of douglas fir, as with the bridge sink.
For the control cavity route, I simply cut and shaped a block of fir to fit into the route and glued it securely in - I wasn't as worried about hiding that route since it was going to be under the pickguard.
Once the blocks were glued in - and had dried and any small gaps were filled with wood shavings or minimal wood filler - the body was sanded down to prep it for staining, as would have been done by Fender. There were a few slight remnants of yellow stain on the guitar body, even after all the refinishes and sanding and stripping.
The yellow does show where some of the staining from the brown undercoat that had previously been on the guitar still was showing. Even without the extra routes, this body would not have been a good candidate for a Fender 3-color sunburst refin.
Following the staining - several vinyl sealer coats were sprayed on, to seal the grain and prepare the body for primer and paint. The vinyl sealer coat is more or less the same as the Fullerplast material Fender used throughout the later 50s, the 60s and into the early 70's until the thick "poly" finishes came about. Both sunburst and custom color Fenders during that era would have had the yellow stain/Fullerplast treatment as an undercoat.
After a careful block sanding, the body was now ready for its white primer coat. An initial coat was sprayed, which revealed some dings and scratches and rough spots. A small amount of red glazing putty and liberal wet sanding was used to even out these areas and the filled-in routes. Then a second white primer coat was applied and wet sanded to prepare for a color coat.
I didn't take any pictures of the priming process - instead we will jump right to the first color coat!
As I said above - I found that the near vintage Sonic Blue lacquer I had was still in excellent condition - so I thinned it about 1 to 1 with regular lacquer thinner - and started spraying. I sprayed several coats on, without any sanding between - to build up a color base. The picture below is shortly after spraying - note that the finish is fairly "flat" - as it has not been wet sanded yet and I was spraying with a bit thicker paint and higher pressure to build up a good base.
This coat will be wet sanded, which will undoubtedly result in a few sand throughs to the primer, but then a second "wet" color coat will be all the color needed. I expect to finish the color coats and have a clear coat on the bass by the end of this week - check back then. This will deepen and strengthen the blue in this finish.
(Update May 16th, 2008)
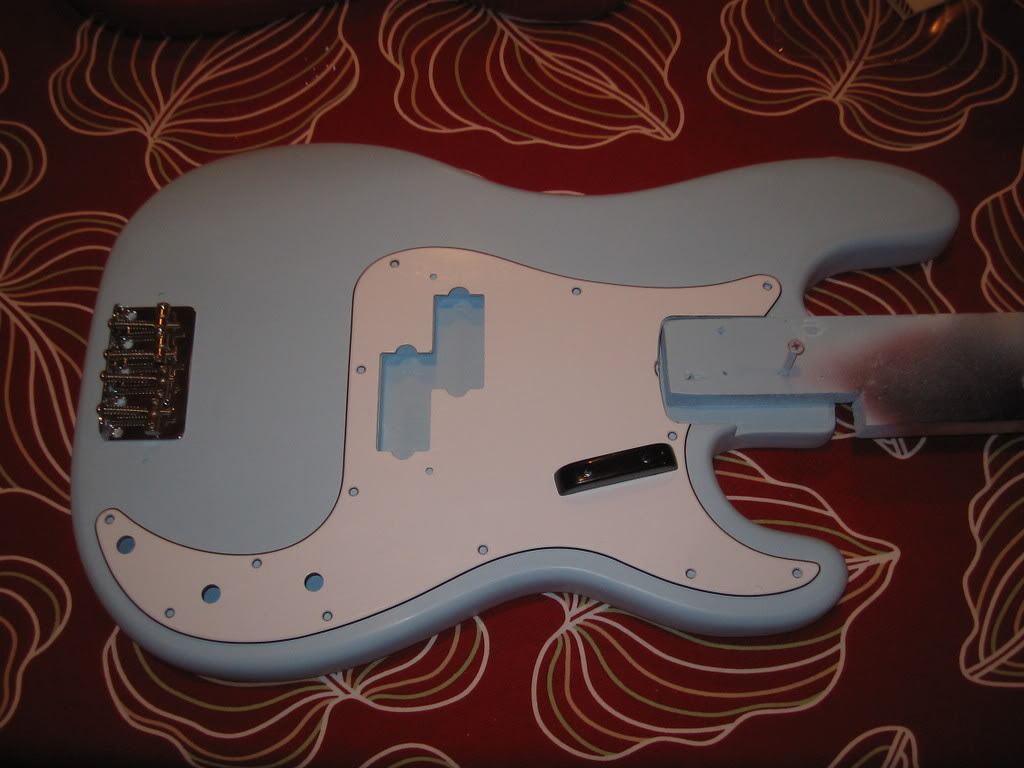
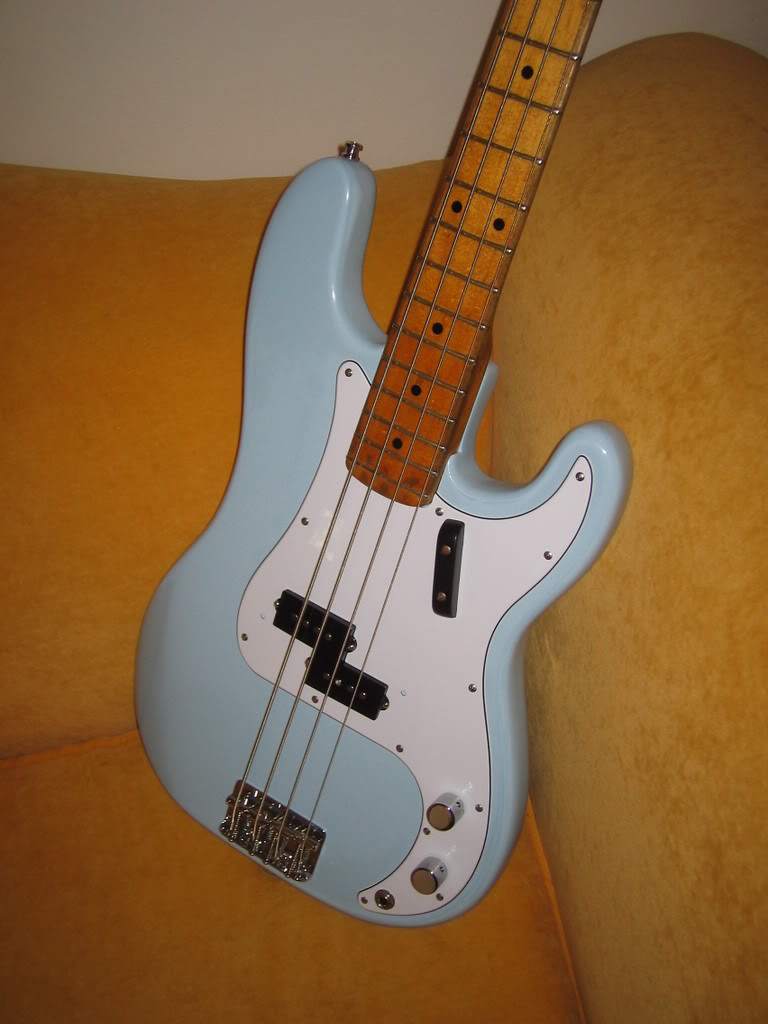
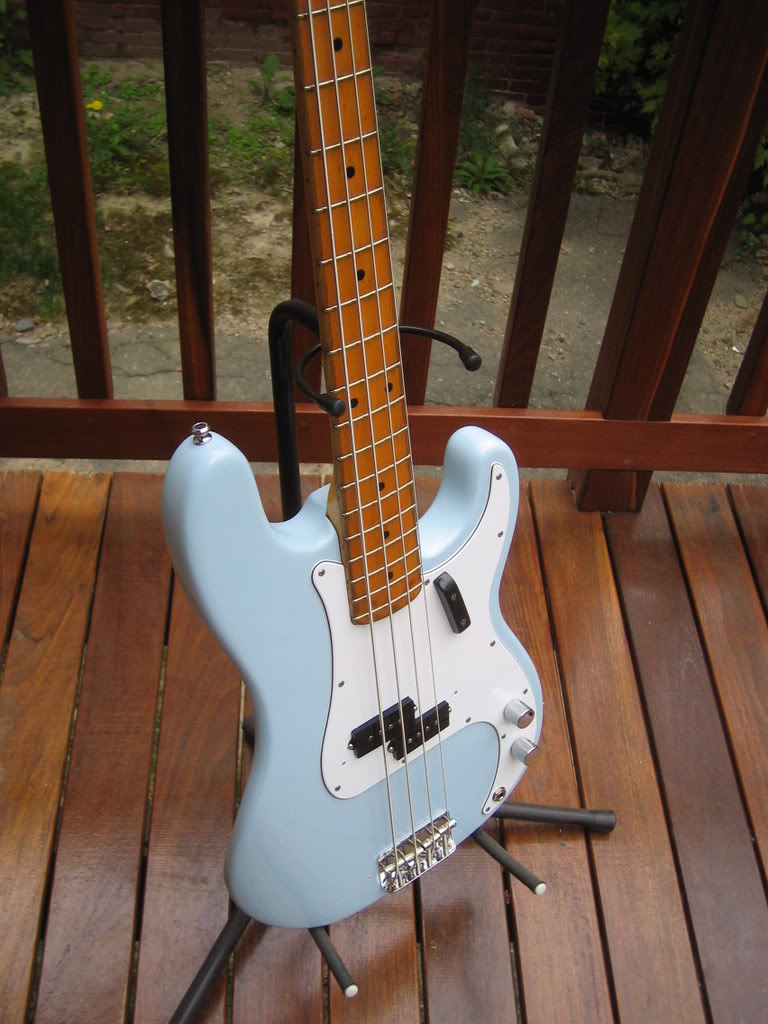
I have completed the bass - it took a few extra color coats on the front of the bass to get the routing fills level with the rest of the surface, but after a few untinted clear coats, the bass was ready for wet sanding and then buffing.
The electronics were then switched to a new white pickguard, which is appropriate for a 1971 custom color P-bass, as opposed to the reissue tortoise shell guard that was on it. A little soldering, and the bass was finished and strung up. A Fender-style bridge replaces the BadAss bridge that was on the bass - which required setting the action and intonation.
This color has a very cool look to it and it will probably start to look a lot like surf green as the clear topcoat yellows in a few years.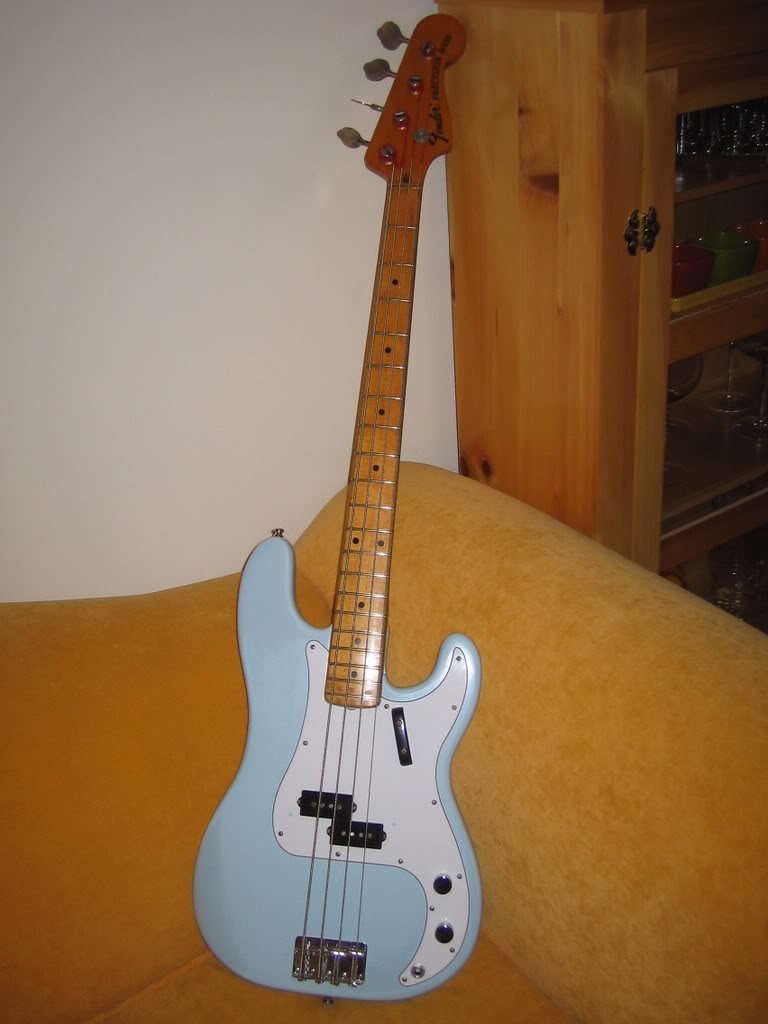

- 1976 Fender Precision Bass: Refinish To Lake Placid Blue - A Classic 60s Color!
This is a fairly straight forward refinish of a stripped Fender Precision bass body in one of Fender's classic 1960s custom colors, Lake Placid Blue. As with all of the Fender custom colors of the 60s, Lake Placid Blue was originally a car color for...
- 1978 Fender Musicmaster Bass: Detonator Yellow With Competition Stripes!
Here is a refinish of a vintage instrument, but not to a "vintage" color - rather, the owner wanted to replicate the look he had seen on Dodge's own "reissue" of the Superbee muscle car - a color that Chrysler labeled "Detonator Yellow". To really...
- 1966 Fender Jazzmaster: Aged Olympic White
< A fairly straightforward project here - a 1966 Fender Jazzmaster body that had been poorly refinished over the years and that the owner wanted to do in an aged Olympic White finish. The original Olympic White is a color thats seldom seen - its a bright...
- G&l Asat Bass Refinish
Ok some of you may wince, because this bass had a very nicely done factory cherry sunburst finish when I started on it, but the owner simply didn't like it and wanted something brighter and louder and more ... ORANGE !!! This is a very cool bass -...
- Squier Strat Quickie Paint Job
A customer acquired Squier of indeterminate vintage, for free I believe, and decided they wanted to "spiff" it up without spending a lot. Since the Squier had the typical poly urethane/polyester bowling ball finish and it was a heavy plywood body, we...