Guitar
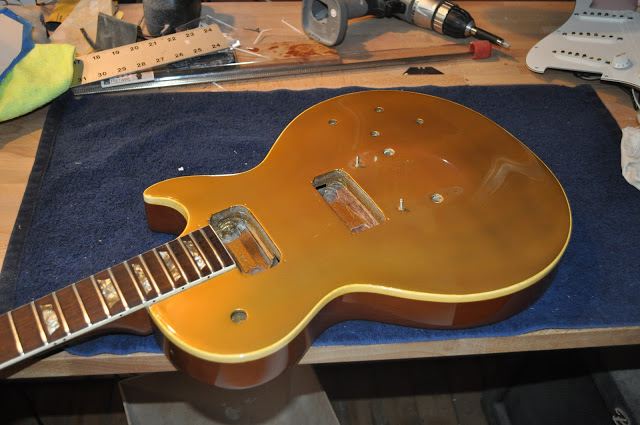
One of the classic electric guitar finishes is the Gibson Goldtop finish, which debuted in the early 50s on the Gibson Les Paul and ES-295.
The finish consists of finely ground bronze powder suspended in clear lacquer, resulting in a gorgeous deep metallic gold color. Due to the behavior of the bronze particles, it is a challenging finish to get even color and consistent results with, but I'll try to outline my experiences in this post to make it a little easier for anyone else out there.
The guitar being refinished is a slightly modified and stripped 1969 Les PaulDeluxe Standard - which is one of the earliest of Gibson's "re-issues" of 1950s Les Pauls. The guitar would have been originally fitted with P-90 pickups and had a Goldtop finish, with a stained mahogany back and neck and white binding on both the top and neck.
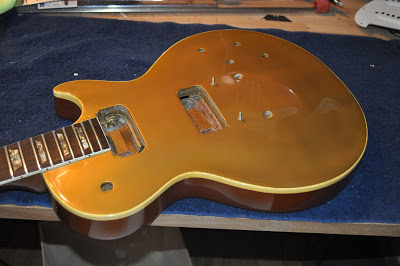
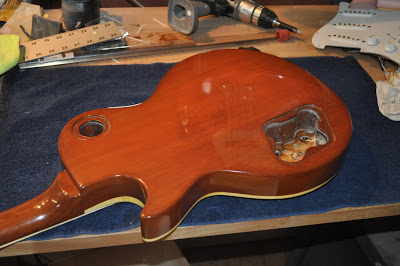
This example had been stripped - and routed for humbuckers - and had a side ding repaired, and then had grain filler and a few tinted coats of finish applied to the back and neck. The pickup cavities needed some wood added at the corners for pickup surround mounting screws, but otherwise there was no wood work required on the guitar.
Note the 3 piece maple top - the very earliest of the "reissue" Goldtops made in 1968 had two piece tops with a center seam.
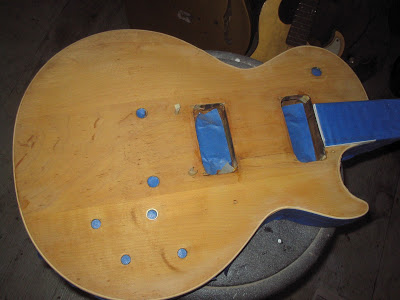
I did discuss returning the guitar to its original twin P-90 configuration, but the owner preferred the sound of humbuckers and opted not to. This picture illustrates the pickup cavities have been widened to fit humbuckers.
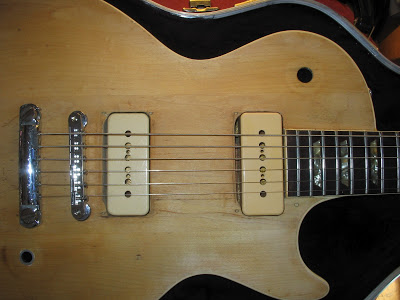
There were remnants of the original gold finish in both pickup cavities - which would prove useful for properly tinting the final finish (see at the edges of the tape).
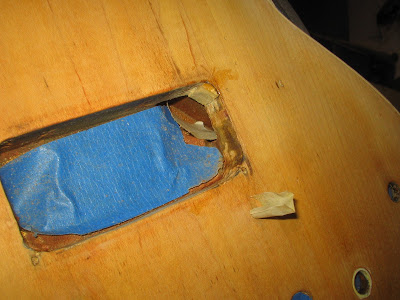
You can see the little curls of gold lacquer behind the scraper. The lacquer is much softer than the plastic binding if you don't let it cure, so not much pressure is needed - the goal is to NOT scrape down the binding at all, though inevitably a little does come off in places where the binding is a little rough and the gold finish is imbedded in the binding a little. Ideally, there is some of the sealer coat between the plastic binding and the goldtop to act as a buffer - the binding should NOT be masked for the sealer coats.
Here's the top edge of the binding starting to look pretty clean. The color difference is due to the flash vs incandescent lighting in the prior picture.
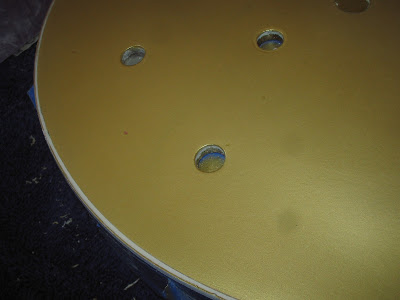
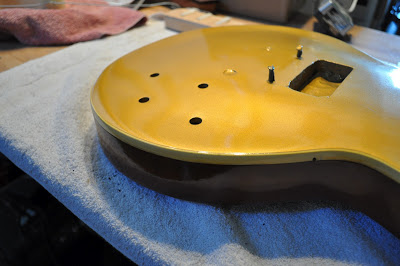
The entire instrument was clearcoated - since the back of the body and neck had not been completely finished when I received the instrument. I let the finish cure for several weeks before doing the usual wet sanding and buffing process - taking extra care not to sand through the clear coat on the top. Note that the Les Paul's carved top (and unremovable bridge posts!) made it necessary to hand wet sand the entire top - something to remember to price in when giving a quote!!
Here is the completed refinish - though without the hardware installed. I also taped off and preserved the original but somewhat chipped and battered headstock.
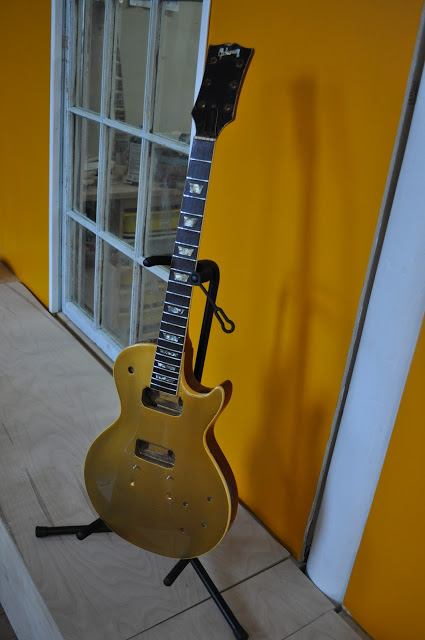
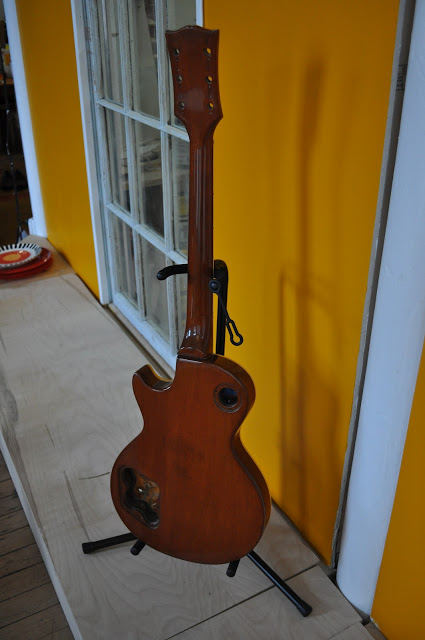
Notice that the original finish inside the pickup cavities matches the top !!
- How To: Fender Mary Kaye Blonde Finish
The Mary Kaye finish is a slightly transparent blonde finish - much like Fender's blonde Telecaster finish but without any yellow tint (and very different from the more yellowed and more transparent butterscotch finish) - applied over ash wood and...
- 1976 Fender Precision Bass: Refinish To Lake Placid Blue - A Classic 60s Color!
This is a fairly straight forward refinish of a stripped Fender Precision bass body in one of Fender's classic 1960s custom colors, Lake Placid Blue. As with all of the Fender custom colors of the 60s, Lake Placid Blue was originally a car color for...
- 1966 Fender Jazzmaster: Aged Olympic White
< A fairly straightforward project here - a 1966 Fender Jazzmaster body that had been poorly refinished over the years and that the owner wanted to do in an aged Olympic White finish. The original Olympic White is a color thats seldom seen - its a bright...
- G&l L1000 Bass - Partial Refinish
Another project that has recently come my way - an early 80s G&L L-1000 bass with a mahogany body and a transparent brown or mocha finish - that has suffered from some sort of finish deterioration on the front face only. The pits in the finish actually...
- G&l Asat Bass Refinish
Ok some of you may wince, because this bass had a very nicely done factory cherry sunburst finish when I started on it, but the owner simply didn't like it and wanted something brighter and louder and more ... ORANGE !!! This is a very cool bass -...
Guitar
How to Refinish a 1969 Les Paul Goldtop
One of the classic electric guitar finishes is the Gibson Goldtop finish, which debuted in the early 50s on the Gibson Les Paul and ES-295.
The finish consists of finely ground bronze powder suspended in clear lacquer, resulting in a gorgeous deep metallic gold color. Due to the behavior of the bronze particles, it is a challenging finish to get even color and consistent results with, but I'll try to outline my experiences in this post to make it a little easier for anyone else out there.
The guitar being refinished is a slightly modified and stripped 1969 Les Paul
This example had been stripped - and routed for humbuckers - and had a side ding repaired, and then had grain filler and a few tinted coats of finish applied to the back and neck. The pickup cavities needed some wood added at the corners for pickup surround mounting screws, but otherwise there was no wood work required on the guitar.
Note the 3 piece maple top - the very earliest of the "reissue" Goldtops made in 1968 had two piece tops with a center seam.
I did discuss returning the guitar to its original twin P-90 configuration, but the owner preferred the sound of humbuckers and opted not to. This picture illustrates the pickup cavities have been widened to fit humbuckers.
There were remnants of the original gold finish in both pickup cavities - which would prove useful for properly tinting the final finish (see at the edges of the tape).
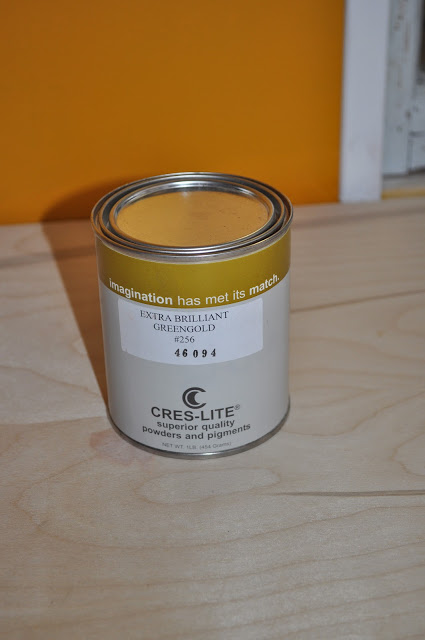
One of the first tasks was to procure the correct bronze powder for the top finish. The owner of the guitar tracked down the source of the bronze powder originally used by Gibson in the 1950s - Cres-Lite made by Crescent Bronze Co. of Oshkosh, WI - and ordered a 2 lb can of their "Extra Brilliant Gold #256" bronze powder. Crescent makes an amazing variety of metallic powder pigments - worth checking out their website sometime!!

More recently, Gibson has switched to an entirely different pigment that is composed of gold-colored mica chips, as opposed to a metallic powder. Gibson made this change to prevent the classic "greening" that occurs with Goldtop finishes when the protective clear top coat wears away - the "greening" is due to oxidation of the copper in the bronze powder, and typically occurs at the upper edge of the body where the player's arm wears away the clear coat and sweat speeds the oxidation of the bronze powder finish.
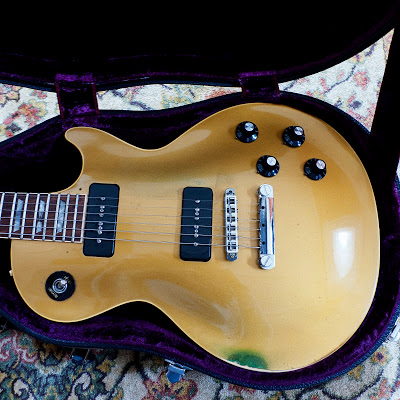 |
| Example of goldtop finish wear and "greening" |
The first step was to fill some small dings (from the pickguard bracket mainly) and then seal the maple top and sand it as smooth and even as possible, since as with ANY metallic finish, flaws in the underlying guitar would be very visible otherwise. I used a nitrocellulose sanding sealer on the maple - no grain filler is necessary on close-grained woods like maple. There's also no primer coat under a goldtop finish, or for that matter under ANY of Gibson's lacquer finishes.
Before spraying the color coat on the top, I did mask off the sides of the binding, but not the top edge. The binding on Gibson instruments is traditionally sprayed with the color coat and then scraped clean with a razor while the finish is not fully cured - and then oversprayed with a clear coat along the with the rest of the instrument.
Scraping the binding is easier and cleaner than trying to mask the curved lines of the binding around the top of an instrument. The sides are masked as they are straight and therefore easy to accurately mask.
Once the masking was in place, I mixed the goldtop color by mixing about two teaspoons of bronze powder into about 6 ounces of clear gloss lacquer. This was then thinned about 50% for spraying, with frequent stirring before the spraying.
It is also important to clean out your spray gun immediately after spraying, as the bronze powder tends to clump together and block the gun or spit out chunks of bronze pigment on the next use. Also, do not use the same spraygun for clear finishes after using it for any metallic powder finishes, as one or two small grains of metallic pigment will inevitably show up in the middle of you otherwise perfect cherry SG Junior refinish !!!
I actually had to spray this top twice - because I did have the exact problem I described above after I had applied a tinted clearcoat over the gold coat. I was in the midst of spraying a clear gloss top coat, prior to wet sanding and buffing - and a piece of bronze pigment spat out of the gun and stuck in the finish. I attempted to wet sand it out, but this cut into the tinted clear coat and then it was impossible to match the tint evenly again ( I did try and wasted a lot of time trying !!).
But anyway - I'll describe the rest of the process sans the mishaps - just realize this is a finish that is unforgiving of flaws !
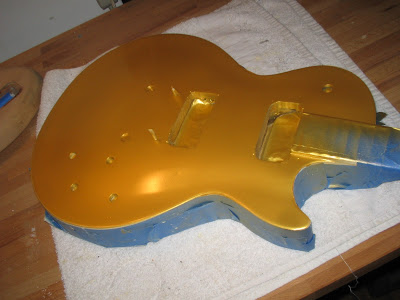
So the second time through - I sprayed the gold top on in several coats - trying to get as even a finish as possible. I also used a different gun from the one I usually use - I used a small automotive detail spray gun - NOT an HVLP gun, as the HVLP gun didn't seem to lay down as smooth a goldtop finish. This does mean more overspray - and bronze powder everywhere - so be prepared to clean up thoroughly afterwards.
For the last color coat, I thinned the finish with a little extra acetone and lowered the air pressure a little more - and focused on just laying down the final coat, lightly and evenly. Once it looked good, I immediately sprayed a light clear gloss coat to seal in the bronze powder. The dark spots in this picture near the controls is just a product of reflections in my camera lens, not on the actual finish.
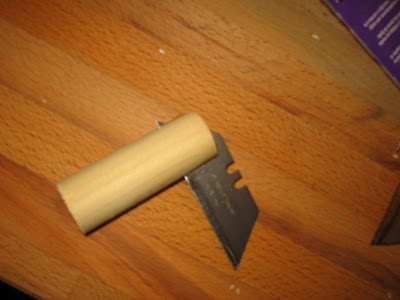
I let the finish set up for a day and then set about scraping the binding. I made a little jig from piece of dowel and a razor blade, though I also ended up doing a bit of scraping freehand. The razor is sticking out just enough to scrape the width of the binding and is glued in place (super glue).
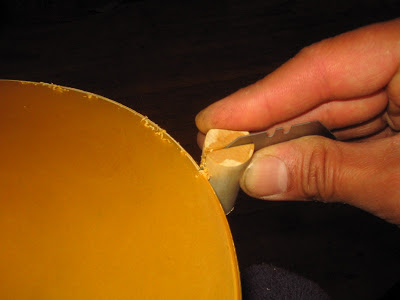
You can see the little curls of gold lacquer behind the scraper. The lacquer is much softer than the plastic binding if you don't let it cure, so not much pressure is needed - the goal is to NOT scrape down the binding at all, though inevitably a little does come off in places where the binding is a little rough and the gold finish is imbedded in the binding a little. Ideally, there is some of the sealer coat between the plastic binding and the goldtop to act as a buffer - the binding should NOT be masked for the sealer coats.
Here's the top edge of the binding starting to look pretty clean. The color difference is due to the flash vs incandescent lighting in the prior picture.
Once the color coat was set and the binding scraped and cleaned completely - it was time to apply a tinted clear coat to the goldtop to try to match the remnants of the finish in the pickup cavities and to tint the binding to give it the correct aged look (which IS due to the lacquer overspray darkening more than it is the plastic darkening).
I used Stew-mac's vintage amber tint in a clear gloss base - tinted lightly - and then slowly built up the color over several thin coats. I looked at the binding and checked in the pickup cavities to get what I felt was a good even level of tinting.
Finally - the sides and top are tinted and clear coated after scraping and cleaning the binding.
Here is the completed refinish - though without the hardware installed. I also taped off and preserved the original but somewhat chipped and battered headstock.


Notice that the original finish inside the pickup cavities matches the top !!
- How To: Fender Mary Kaye Blonde Finish
The Mary Kaye finish is a slightly transparent blonde finish - much like Fender's blonde Telecaster finish but without any yellow tint (and very different from the more yellowed and more transparent butterscotch finish) - applied over ash wood and...
- 1976 Fender Precision Bass: Refinish To Lake Placid Blue - A Classic 60s Color!
This is a fairly straight forward refinish of a stripped Fender Precision bass body in one of Fender's classic 1960s custom colors, Lake Placid Blue. As with all of the Fender custom colors of the 60s, Lake Placid Blue was originally a car color for...
- 1966 Fender Jazzmaster: Aged Olympic White
< A fairly straightforward project here - a 1966 Fender Jazzmaster body that had been poorly refinished over the years and that the owner wanted to do in an aged Olympic White finish. The original Olympic White is a color thats seldom seen - its a bright...
- G&l L1000 Bass - Partial Refinish
Another project that has recently come my way - an early 80s G&L L-1000 bass with a mahogany body and a transparent brown or mocha finish - that has suffered from some sort of finish deterioration on the front face only. The pits in the finish actually...
- G&l Asat Bass Refinish
Ok some of you may wince, because this bass had a very nicely done factory cherry sunburst finish when I started on it, but the owner simply didn't like it and wanted something brighter and louder and more ... ORANGE !!! This is a very cool bass -...
