Guitar
The Concept
This project grew out of the idea of building a true beginner's instrument for kids, that would get them started on the path to playing music and minimize the initial discouraging hurdle of "my instrument won't make any good sounds".
I drew on my own experience as a kid - trying to learn to read music and play the recorder - along with all my other 1st grade classmates - as a lesson on how NOT to do it. That experience was so bad I had no desire to make a second try until I was high school and saw the Ramones play live - and thought "I can do that !!"
But even then, I remember finding guitar a bit challenging and I actually ended up playing bass initially - and then going back and forth between the two. But starting on bass allowed me to learn timing and concepts of repeated riffs and progressions - without getting tangled up in all those skinny little guitar strings and complicated chords - it was just one string and one note at a time.
I also picked up the skill of identifying the root notes in a song pretty early on - which meant I could figure out my own bass lines that would at least "work" when playing with others - and later on, once I learned a little bit about guitar, was really helpful in allowing me to improvise guitar leads.
I also thought back to the songs I first started out learning - the ones that were easy yet gratifying to play - ranging from the holy trinity of "Louie, Louie"/"Wild Thing"/"Hang on Sloopy" - to "Wipeout" - to "Blitzkrieg Bop". All of them solidly rooted in a 1-4-5 blues tradition - all of them with "connect the dots" riffs (e.g. all the notes being on fretboard positions with dot markers).
The other common element with all these songs was that they could all be played on just TWO strings - the "E" and "A".
I decided to build an instrument that would facilitate everything that made my initial experiences of playing rock n roll with my friends so fun enough - and encouraged me to continue to learn and start writing my own music. An instrument that would provide a solid foundation for playing rock music by teaching timing, rhythm and the basics of making tuneful sounds come out of a stringed instrument.
So the concept for this instrument began to gel in my mind - a short-scale and narrow neck best suited for smaller hands, two-strings to simplify playing and instruction ("upper and lower" string), semi-hollow construction so it could be played unplugged and would be light, and a body shape that wouldn't require a guitar stand.
The Design
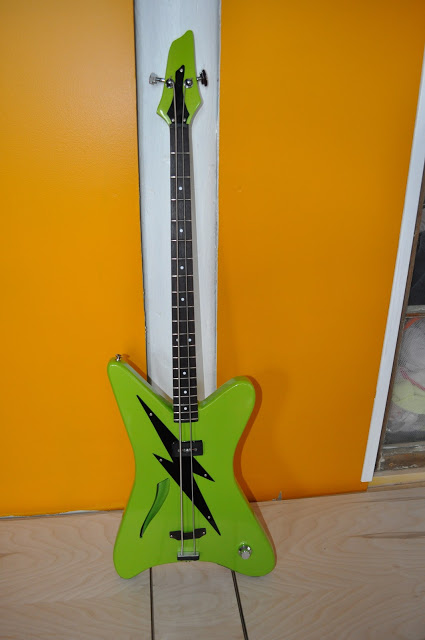
This bass was actually commissioned by a 7 year-old boy's mom - so I DID have a few design parameters to work with: he wanted it a lime green color and he wanted a lightning bolt on it !! And his mom wanted to try to give it to him in time for the holidays - so I had roughly 4 weeks to build it from sketch to completion !!
At first I was designing the bass with a 30-inch scale - the same scale used on many Gibson, Guild and Danelectro basses (EB-0, EB-2, Starfire) and on Fender Mustang and Musicmaster basses - but I realized after doing a rough layout that even a 30-inch scale might be unwieldy for a 7-year old - so I opted for a 27 1/2 inch scale. To compensate for the short scale and keep the string tension from being TOO low, I planned on using the low-B and E string from a 5-string bass set - that is, .135 and .105 gauge strings.
For the body shape, I wanted something non-traditional - and as I said before, something that would stand pretty securely on its own. I drew some inspiration from the Dean ML body shape - and made a quick sketch on a bank deposit slip.
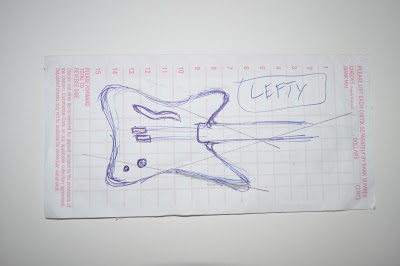
I then made a full size paper template of the instrument - which made me change my mind and flip the body shape upside down (compare the template to the rough body and neck). I used the headstock of my 1979 Ibanez Iceman as the inspiration for the headstock shape.

To make the instrument easy to build and set up - I decided on a bolt-on neck - and as I said before - a semi-hollow design. The body was built in a very "Danelectro"-style, with a 1 inch thick pine frame around the edges and a neck block - and then 3/32th inch plywood for the front and back of the body.
I had toyed with using two of Hipshot's Triple Lock 1-string bridges but then decided if I wanted the bass to truly be semi-acoustic, an archtop style carved rosewood bridge would be more likely to carry the string vibrations to the body top. I also decided to try using half a P-bass pickup, since I'd only have two strings.
The neck blank was a piece of 3/4 in. poplar - straight from Home Depot.
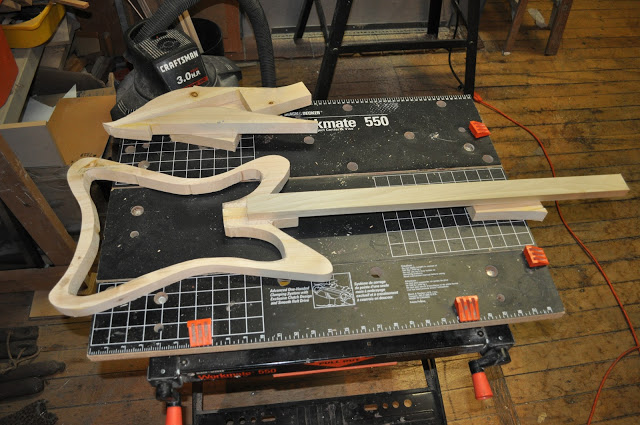
I used a table-saw a great deal to build the narrow neck. I first cut a slot for the double-acting Stewart-Macdonald truss rod using two passes on the table saw. After the neck was tapered, I added two small wings of poplar make the headstock and inlaid a narrow piece of walnut into the part of the truss-rod slot that extended through the headstock. I used a belt sander to taper the face of the headstock backwards before gluing on the fretboard.
Then I installed the truss rod and glued on the pre-slotted and radiused rosewood fretboard (purchased from Luthier's Mercantile). I used a simple jig made from a piece of plywood to taper the entire neck blank and fretboard.
The rough cut neck and body are pictured below - with a pickup and volume knob just positioned for layout.
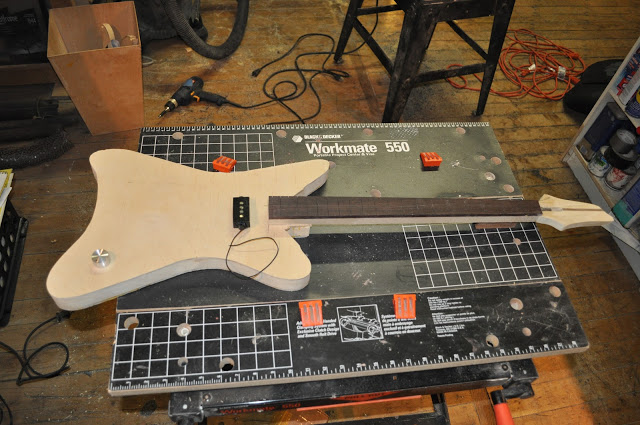
In the next picture I've sanded the body edges and then used a router to round off the edges. I also used the router to cut away a neck pocket - using a template cut from masonite. A rickenbacker-style slash sound hole has been added to the upper bout - it was really noticeable how much sound it projected when I tapped on the body before and after cutting the sound-hole - surprising!
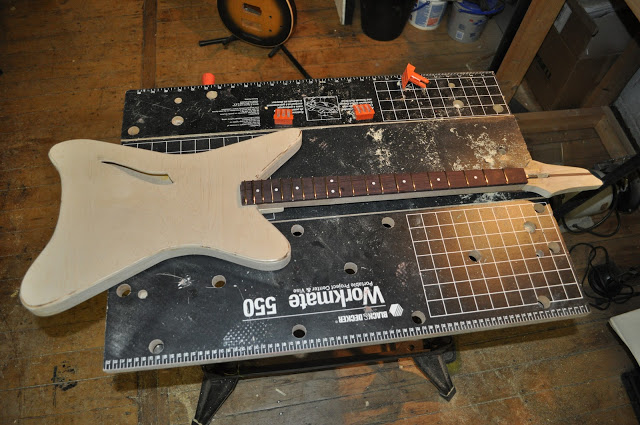
The fretboard has also been had dot inlays placed (white plastic), then been radiused (7.25 inches radius) and fretted with normal Fender bass-size wire. The neck is still unshaped at this stage.
The neck was contoured using a Micro-plane rotary shaper - which is a fearsome looking device - very effective for the rough shaping of necks - the trick is to use a light touch and keep a firm grip on the work piece so that the cutter doesn't dig in and leave a big gouge in the back of your neck.
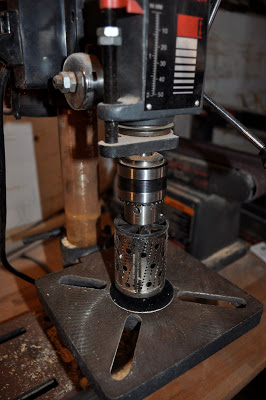
I usually have the cutter lowered right onto the deck of the drill press - though I plan on cutting a hole in a plastic cutting board and putting this on top of the current deck so that the cutter part of the rotary plane is even with the work surface.
I have used this device on maple, poplar and mahogany necks - it's remarkably tough. I bought mine at Rockler, but Microplane products are widely available.
Once the rough shaping and contouring of the neck was accomplished, I worked down from a rasp, several different files and finally 100 grit sandpaper to get the neck contour I wanted. A down-draft table for dust collection is high on my list of "things to acquire" !! Carving a neck generates a lot of wood chips and saw dust !
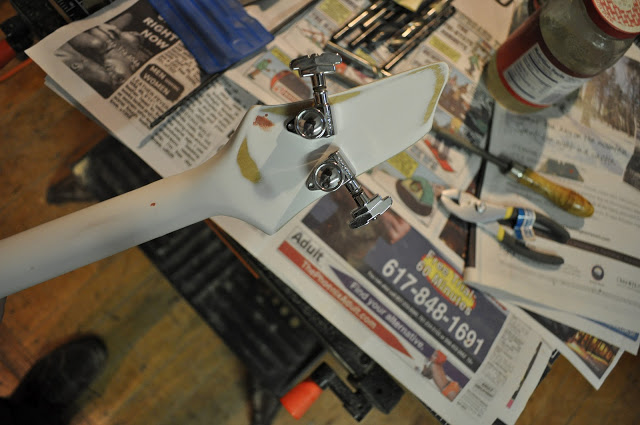
I unfortunately neglected to take pictures of the neck carving process - but here's the neck after being sealed (nitrocellulose sanding sealer) and primed and sanded - with two spare Grover Imperial tuners in place.
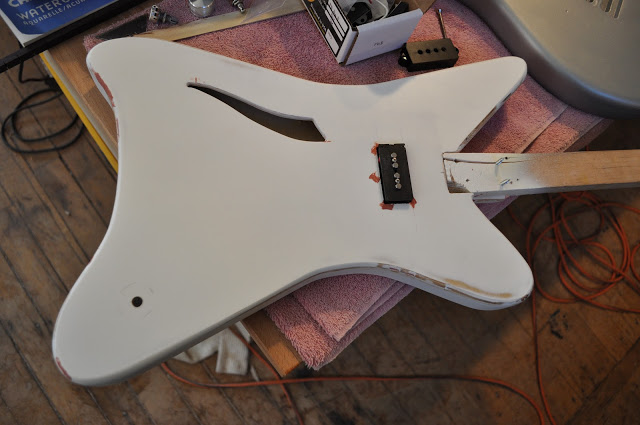
Here's the body at the same stage - with the single coil pickup ( 1/2 a GFS-brand P-bass pickup) positioned.
The instrument was now ready for painting - and after initially mixing my own green color - I recalled seeing a can of acrylic lacquer at Autozone called "Sublime Pearl Green" - I decided to make the 3-minute drive to the shop - and sure enough, it was still in stock. The paint was high quality acrylic lacquer, though much thinner than the lacquer I buy from Restoration Auto - so I'd say the quart I purchased for $25 was roughly equivalent to less than a pint of lacquer from Restoration Auto. However, after hazmat shipping charges, etc. - a quart of paint from Restoration Auto usually costs me between $60 and $80 - so the price was very reasonable ! And it was convenient.
I still thinned the lacquer further with some straight acetone - and then sprayed several medium coats to make sure I had a fully opaque finish. The last coat I thinned a little more and sprayed at a lower pressure to lay on a very even and thin coat - with the goal of getting the "pearl" to look even across the entire body and neck.
A day later, I applied a few clear gloss coats of nitro - again at low pressure - I was aiming for a "no-buff" finish, since I was on pretty tight schedule.
While the lacquer was setting up - I moved ahead with creating the requested "lightning bolt". At first I considered painting it on but then I thought I'd get a more striking (pun intended) result by cutting a lightning bolt out of thin black pickguard material. This would also be more durable and maybe even somewhat act as a pickguard. I made a truss rod cover out of the same material.
The hardware is rough fit below - if you look closely at the headstock you can see the little flecks of "pearl" !!
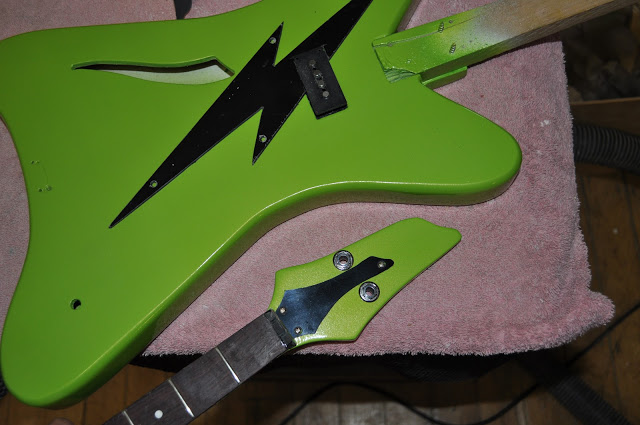
The rest of the hardware was somewhat hurriedly fabricated: I made a tailpiece inspired by the one on my 1965 Mosrite Venture's Bass - a short piece of right-angled aluminum corner with a rosewood insert - drilled for two strings and for two mounting screws. The bridge was carved from two pieces of 1/4 inch rosewood laminated together and then cut and shaped on my belt sander. The string nut was cut from a piece of black plexiglas, Rickenbacker style.
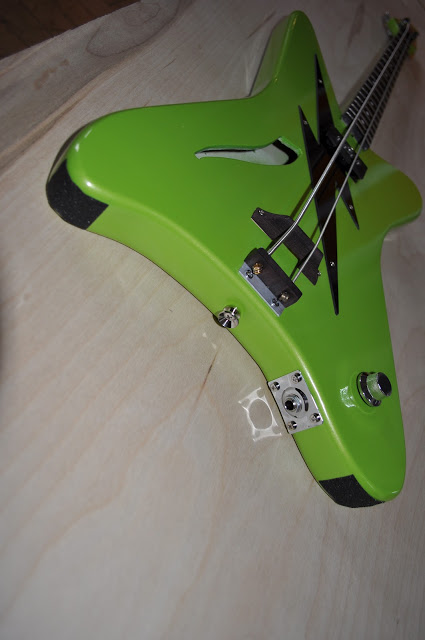
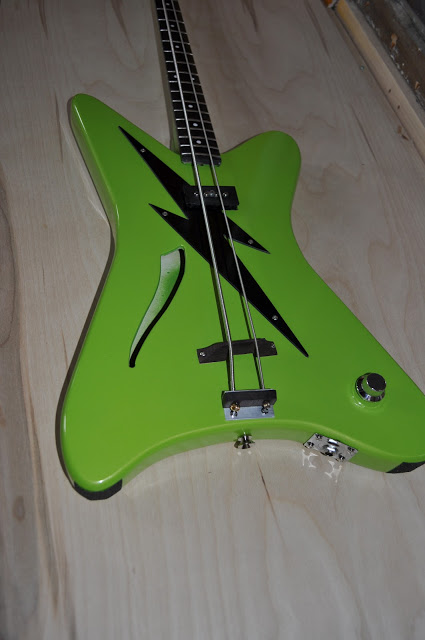
The view below shows the tailpiece and bridge. The side-mount jack, single volume knob and strap buttons are all from Guitar Fetish.
Once I finally strung the bass up and tensioned it - I had to tweak the neck a little - some tightening of the truss rod - a little shimming of the neck pocket (to get the strings higher off the body to get some good downforce on the bridge) - and a little filing of a few frets in the higher registers to get rid of some buzzing.
Once I had the bridge positioned for good intonation - I fixed it in position with two small pickguard screws. I didn't want the young owner to have to struggle with finding the correct bridge position again just because he changed the strings !!
As a final step - I applied two small pieces of 3M footgrip tape on the two "feet" of the body - to make it less likely that the guitar would slip and fall if it were left standing up - and to protect the finish and wood when the instrument was standing up.
Completed
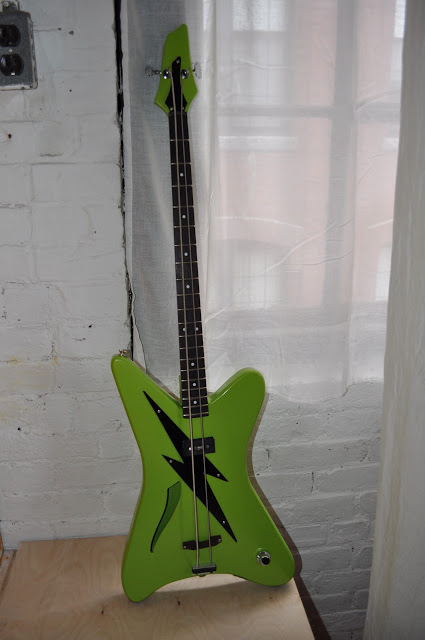
What was most surprising was the sound of the bass - the single-coil pickup, low-tension fat strings and semi-hollow body led to the bass sound almost like a fretted stand-up bass !! It had a VERY big sound !!
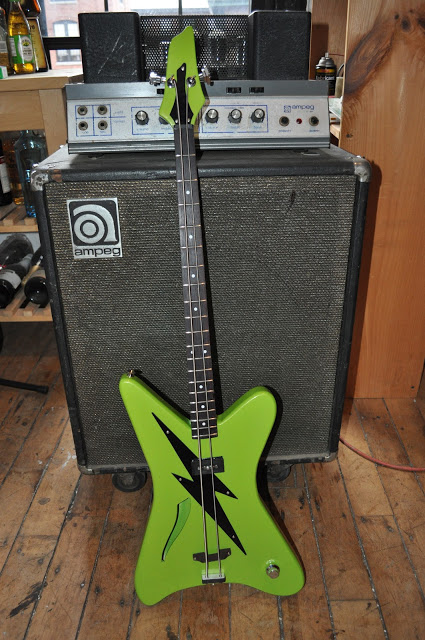
The bass standing in front of my trusty Ampeg B-15N - to give you an idea of it's size - roughly the same as a Fender Strat.
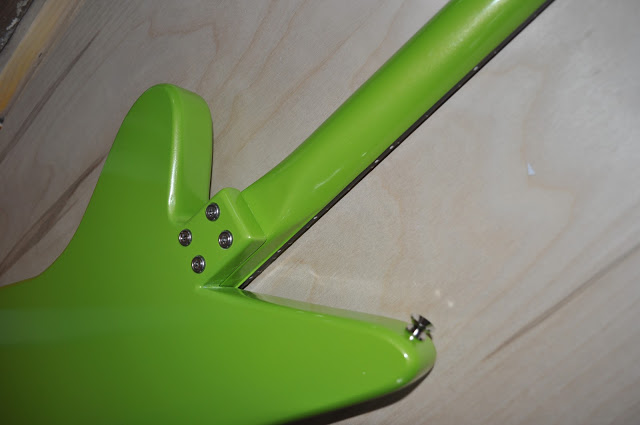
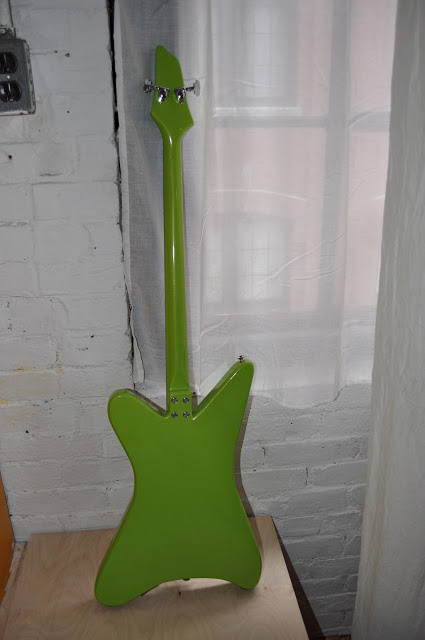
A good view showing off the "pearl" in the Sublime Green Pearl finish - especially on the back of the neck. The back of the neck and headstock were wet sanded, compounded and buffed, whereas the body was simply buffed with a dry clean buffing bonnet.
I'm very happy with how this bass turned out but I am thinking of some changes for "Mark II".
For one thing, I'd try to accentuate the acoustic characteristics by making the frame of the body deeper and thinner - using 1 1/2 inch pine and 1/16th plywood for the top and back - with two longitudinal braces under the top - and maybe by adding a second sound hole.
I'd also probably use a Firebird-style baby-humbucker, as the single-coil 1/2 P-bass pickup does pickup electronic noise from neon lamps, etc. Though I'd have to see how this would affect the sound.
I might also add a 3rd string (but keep the narrow neck) - as this would make it pretty much a fully-functional, gig-able instrument - though not sure that will follow my original "concept".
- Vintage & Rare Guitar Of The Week: 1965 Koontz Tripleneck 12-string Guitar, 6-sting Guitar And 6-string Bass
guitarz.blogspot.com: I'll allow the extensive description on Vintage & Rare to give you the necessary info about the above-pictured beast: This is a one-of-a-kind Custom Triple-neck guitar was specially built by New York Luthier Sam Koontz...
- Concrete Bass Prototype: What Is Heavier Than Metal ????
Last spring, while in the middle of creating some small concrete countertops for a tattoo shop build-out (Pumpkin Tattoo in Jamaica Plain) the question came up, "would it be possible to build a concrete body for a guitar"? I decided to give it a shot...
- 75 Jazz Bass: 3-bolt Fender Neck Pocket Tightening
In the early 70s, Fender switched from a traditional 4 screw or 4-bolt neck attachment to a 3-bolt attachment(actually 1 bolt and 2 screws) on the Stratocaster, the Jazz Bass and the Telecaster Bass. This new three-bolt attachment also incorporated a...
- Gibson Rd Standard Bass - Refinish & T-bird-i-fication
A project that perhaps some Gibson purists will frown upon, but the goal is to take somewhat abused Gibson RD bass and give it a bit of a makeover - borrowing the color scheme from 1960's Thunderbirds and hardware from more recent 'birds. The...
- 1978 Musicmaster Bass Project
(originally posted 8. October 2007 on http://s217476017.onlinehome.us/) Hi there, I decided that a blog would be a more flexible forum for me to not only share info and pictures covering guitar projects I'm working on, but also just generally...
Guitar
2 String Shortscale Microbass: Custom built kid's bass

The Concept
This project grew out of the idea of building a true beginner's instrument for kids, that would get them started on the path to playing music and minimize the initial discouraging hurdle of "my instrument won't make any good sounds".
I drew on my own experience as a kid - trying to learn to read music and play the recorder - along with all my other 1st grade classmates - as a lesson on how NOT to do it. That experience was so bad I had no desire to make a second try until I was high school and saw the Ramones play live - and thought "I can do that !!"
But even then, I remember finding guitar a bit challenging and I actually ended up playing bass initially - and then going back and forth between the two. But starting on bass allowed me to learn timing and concepts of repeated riffs and progressions - without getting tangled up in all those skinny little guitar strings and complicated chords - it was just one string and one note at a time.
I also picked up the skill of identifying the root notes in a song pretty early on - which meant I could figure out my own bass lines that would at least "work" when playing with others - and later on, once I learned a little bit about guitar, was really helpful in allowing me to improvise guitar leads.
I also thought back to the songs I first started out learning - the ones that were easy yet gratifying to play - ranging from the holy trinity of "Louie, Louie"/"Wild Thing"/"Hang on Sloopy" - to "Wipeout" - to "Blitzkrieg Bop". All of them solidly rooted in a 1-4-5 blues tradition - all of them with "connect the dots" riffs (e.g. all the notes being on fretboard positions with dot markers).
The other common element with all these songs was that they could all be played on just TWO strings - the "E" and "A".
I decided to build an instrument that would facilitate everything that made my initial experiences of playing rock n roll with my friends so fun enough - and encouraged me to continue to learn and start writing my own music. An instrument that would provide a solid foundation for playing rock music by teaching timing, rhythm and the basics of making tuneful sounds come out of a stringed instrument.
So the concept for this instrument began to gel in my mind - a short-scale and narrow neck best suited for smaller hands, two-strings to simplify playing and instruction ("upper and lower" string), semi-hollow construction so it could be played unplugged and would be light, and a body shape that wouldn't require a guitar stand.
The Design
This bass was actually commissioned by a 7 year-old boy's mom - so I DID have a few design parameters to work with: he wanted it a lime green color and he wanted a lightning bolt on it !! And his mom wanted to try to give it to him in time for the holidays - so I had roughly 4 weeks to build it from sketch to completion !!
At first I was designing the bass with a 30-inch scale - the same scale used on many Gibson, Guild and Danelectro basses (EB-0, EB-2, Starfire) and on Fender Mustang and Musicmaster basses - but I realized after doing a rough layout that even a 30-inch scale might be unwieldy for a 7-year old - so I opted for a 27 1/2 inch scale. To compensate for the short scale and keep the string tension from being TOO low, I planned on using the low-B and E string from a 5-string bass set - that is, .135 and .105 gauge strings.
For the body shape, I wanted something non-traditional - and as I said before, something that would stand pretty securely on its own. I drew some inspiration from the Dean ML body shape - and made a quick sketch on a bank deposit slip.
I then made a full size paper template of the instrument - which made me change my mind and flip the body shape upside down (compare the template to the rough body and neck). I used the headstock of my 1979 Ibanez Iceman as the inspiration for the headstock shape.

To make the instrument easy to build and set up - I decided on a bolt-on neck - and as I said before - a semi-hollow design. The body was built in a very "Danelectro"-style, with a 1 inch thick pine frame around the edges and a neck block - and then 3/32th inch plywood for the front and back of the body.
I had toyed with using two of Hipshot's Triple Lock 1-string bridges but then decided if I wanted the bass to truly be semi-acoustic, an archtop style carved rosewood bridge would be more likely to carry the string vibrations to the body top. I also decided to try using half a P-bass pickup, since I'd only have two strings.
The neck blank was a piece of 3/4 in. poplar - straight from Home Depot.
I used a table-saw a great deal to build the narrow neck. I first cut a slot for the double-acting Stewart-Macdonald truss rod using two passes on the table saw. After the neck was tapered, I added two small wings of poplar make the headstock and inlaid a narrow piece of walnut into the part of the truss-rod slot that extended through the headstock. I used a belt sander to taper the face of the headstock backwards before gluing on the fretboard.
Then I installed the truss rod and glued on the pre-slotted and radiused rosewood fretboard (purchased from Luthier's Mercantile). I used a simple jig made from a piece of plywood to taper the entire neck blank and fretboard.
The rough cut neck and body are pictured below - with a pickup and volume knob just positioned for layout.
In the next picture I've sanded the body edges and then used a router to round off the edges. I also used the router to cut away a neck pocket - using a template cut from masonite. A rickenbacker-style slash sound hole has been added to the upper bout - it was really noticeable how much sound it projected when I tapped on the body before and after cutting the sound-hole - surprising!
The fretboard has also been had dot inlays placed (white plastic), then been radiused (7.25 inches radius) and fretted with normal Fender bass-size wire. The neck is still unshaped at this stage.
The neck was contoured using a Micro-plane rotary shaper - which is a fearsome looking device - very effective for the rough shaping of necks - the trick is to use a light touch and keep a firm grip on the work piece so that the cutter doesn't dig in and leave a big gouge in the back of your neck.

I have used this device on maple, poplar and mahogany necks - it's remarkably tough. I bought mine at Rockler, but Microplane products are widely available.
Once the rough shaping and contouring of the neck was accomplished, I worked down from a rasp, several different files and finally 100 grit sandpaper to get the neck contour I wanted. A down-draft table for dust collection is high on my list of "things to acquire" !! Carving a neck generates a lot of wood chips and saw dust !
I unfortunately neglected to take pictures of the neck carving process - but here's the neck after being sealed (nitrocellulose sanding sealer) and primed and sanded - with two spare Grover Imperial tuners in place.
Here's the body at the same stage - with the single coil pickup ( 1/2 a GFS-brand P-bass pickup) positioned.
The instrument was now ready for painting - and after initially mixing my own green color - I recalled seeing a can of acrylic lacquer at Autozone called "Sublime Pearl Green" - I decided to make the 3-minute drive to the shop - and sure enough, it was still in stock. The paint was high quality acrylic lacquer, though much thinner than the lacquer I buy from Restoration Auto - so I'd say the quart I purchased for $25 was roughly equivalent to less than a pint of lacquer from Restoration Auto. However, after hazmat shipping charges, etc. - a quart of paint from Restoration Auto usually costs me between $60 and $80 - so the price was very reasonable ! And it was convenient.
I still thinned the lacquer further with some straight acetone - and then sprayed several medium coats to make sure I had a fully opaque finish. The last coat I thinned a little more and sprayed at a lower pressure to lay on a very even and thin coat - with the goal of getting the "pearl" to look even across the entire body and neck.
A day later, I applied a few clear gloss coats of nitro - again at low pressure - I was aiming for a "no-buff" finish, since I was on pretty tight schedule.
While the lacquer was setting up - I moved ahead with creating the requested "lightning bolt". At first I considered painting it on but then I thought I'd get a more striking (pun intended) result by cutting a lightning bolt out of thin black pickguard material. This would also be more durable and maybe even somewhat act as a pickguard. I made a truss rod cover out of the same material.
The hardware is rough fit below - if you look closely at the headstock you can see the little flecks of "pearl" !!
The rest of the hardware was somewhat hurriedly fabricated: I made a tailpiece inspired by the one on my 1965 Mosrite Venture's Bass - a short piece of right-angled aluminum corner with a rosewood insert - drilled for two strings and for two mounting screws. The bridge was carved from two pieces of 1/4 inch rosewood laminated together and then cut and shaped on my belt sander. The string nut was cut from a piece of black plexiglas, Rickenbacker style.
The view below shows the tailpiece and bridge. The side-mount jack, single volume knob and strap buttons are all from Guitar Fetish.

Once I finally strung the bass up and tensioned it - I had to tweak the neck a little - some tightening of the truss rod - a little shimming of the neck pocket (to get the strings higher off the body to get some good downforce on the bridge) - and a little filing of a few frets in the higher registers to get rid of some buzzing.
Once I had the bridge positioned for good intonation - I fixed it in position with two small pickguard screws. I didn't want the young owner to have to struggle with finding the correct bridge position again just because he changed the strings !!
As a final step - I applied two small pieces of 3M footgrip tape on the two "feet" of the body - to make it less likely that the guitar would slip and fall if it were left standing up - and to protect the finish and wood when the instrument was standing up.
Completed
What was most surprising was the sound of the bass - the single-coil pickup, low-tension fat strings and semi-hollow body led to the bass sound almost like a fretted stand-up bass !! It had a VERY big sound !!
The bass standing in front of my trusty Ampeg B-15N - to give you an idea of it's size - roughly the same as a Fender Strat.

A good view showing off the "pearl" in the Sublime Green Pearl finish - especially on the back of the neck. The back of the neck and headstock were wet sanded, compounded and buffed, whereas the body was simply buffed with a dry clean buffing bonnet.


I'm very happy with how this bass turned out but I am thinking of some changes for "Mark II".
For one thing, I'd try to accentuate the acoustic characteristics by making the frame of the body deeper and thinner - using 1 1/2 inch pine and 1/16th plywood for the top and back - with two longitudinal braces under the top - and maybe by adding a second sound hole.
I'd also probably use a Firebird-style baby-humbucker, as the single-coil 1/2 P-bass pickup does pickup electronic noise from neon lamps, etc. Though I'd have to see how this would affect the sound.
I might also add a 3rd string (but keep the narrow neck) - as this would make it pretty much a fully-functional, gig-able instrument - though not sure that will follow my original "concept".
- Vintage & Rare Guitar Of The Week: 1965 Koontz Tripleneck 12-string Guitar, 6-sting Guitar And 6-string Bass
guitarz.blogspot.com: I'll allow the extensive description on Vintage & Rare to give you the necessary info about the above-pictured beast: This is a one-of-a-kind Custom Triple-neck guitar was specially built by New York Luthier Sam Koontz...
- Concrete Bass Prototype: What Is Heavier Than Metal ????
Last spring, while in the middle of creating some small concrete countertops for a tattoo shop build-out (Pumpkin Tattoo in Jamaica Plain) the question came up, "would it be possible to build a concrete body for a guitar"? I decided to give it a shot...
- 75 Jazz Bass: 3-bolt Fender Neck Pocket Tightening
In the early 70s, Fender switched from a traditional 4 screw or 4-bolt neck attachment to a 3-bolt attachment(actually 1 bolt and 2 screws) on the Stratocaster, the Jazz Bass and the Telecaster Bass. This new three-bolt attachment also incorporated a...
- Gibson Rd Standard Bass - Refinish & T-bird-i-fication
A project that perhaps some Gibson purists will frown upon, but the goal is to take somewhat abused Gibson RD bass and give it a bit of a makeover - borrowing the color scheme from 1960's Thunderbirds and hardware from more recent 'birds. The...
- 1978 Musicmaster Bass Project
(originally posted 8. October 2007 on http://s217476017.onlinehome.us/) Hi there, I decided that a blog would be a more flexible forum for me to not only share info and pictures covering guitar projects I'm working on, but also just generally...
